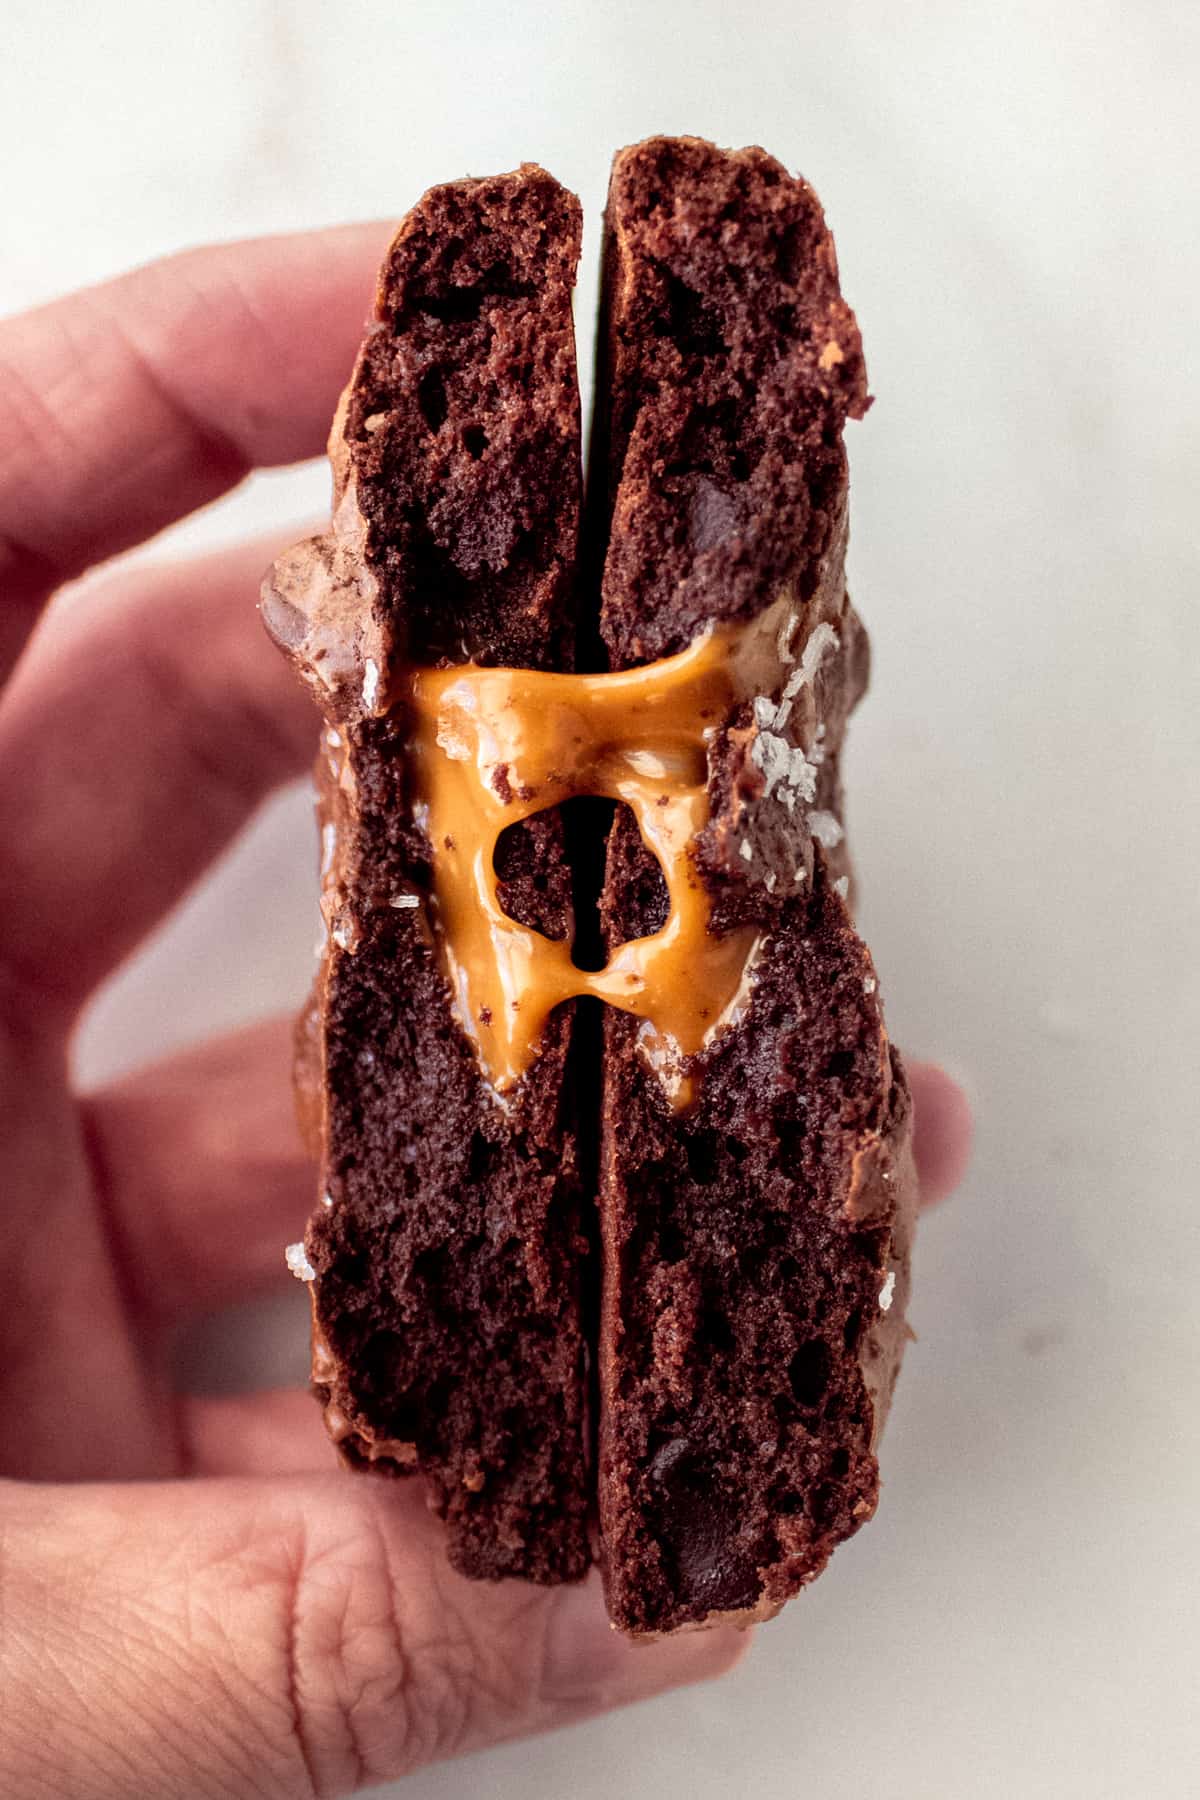
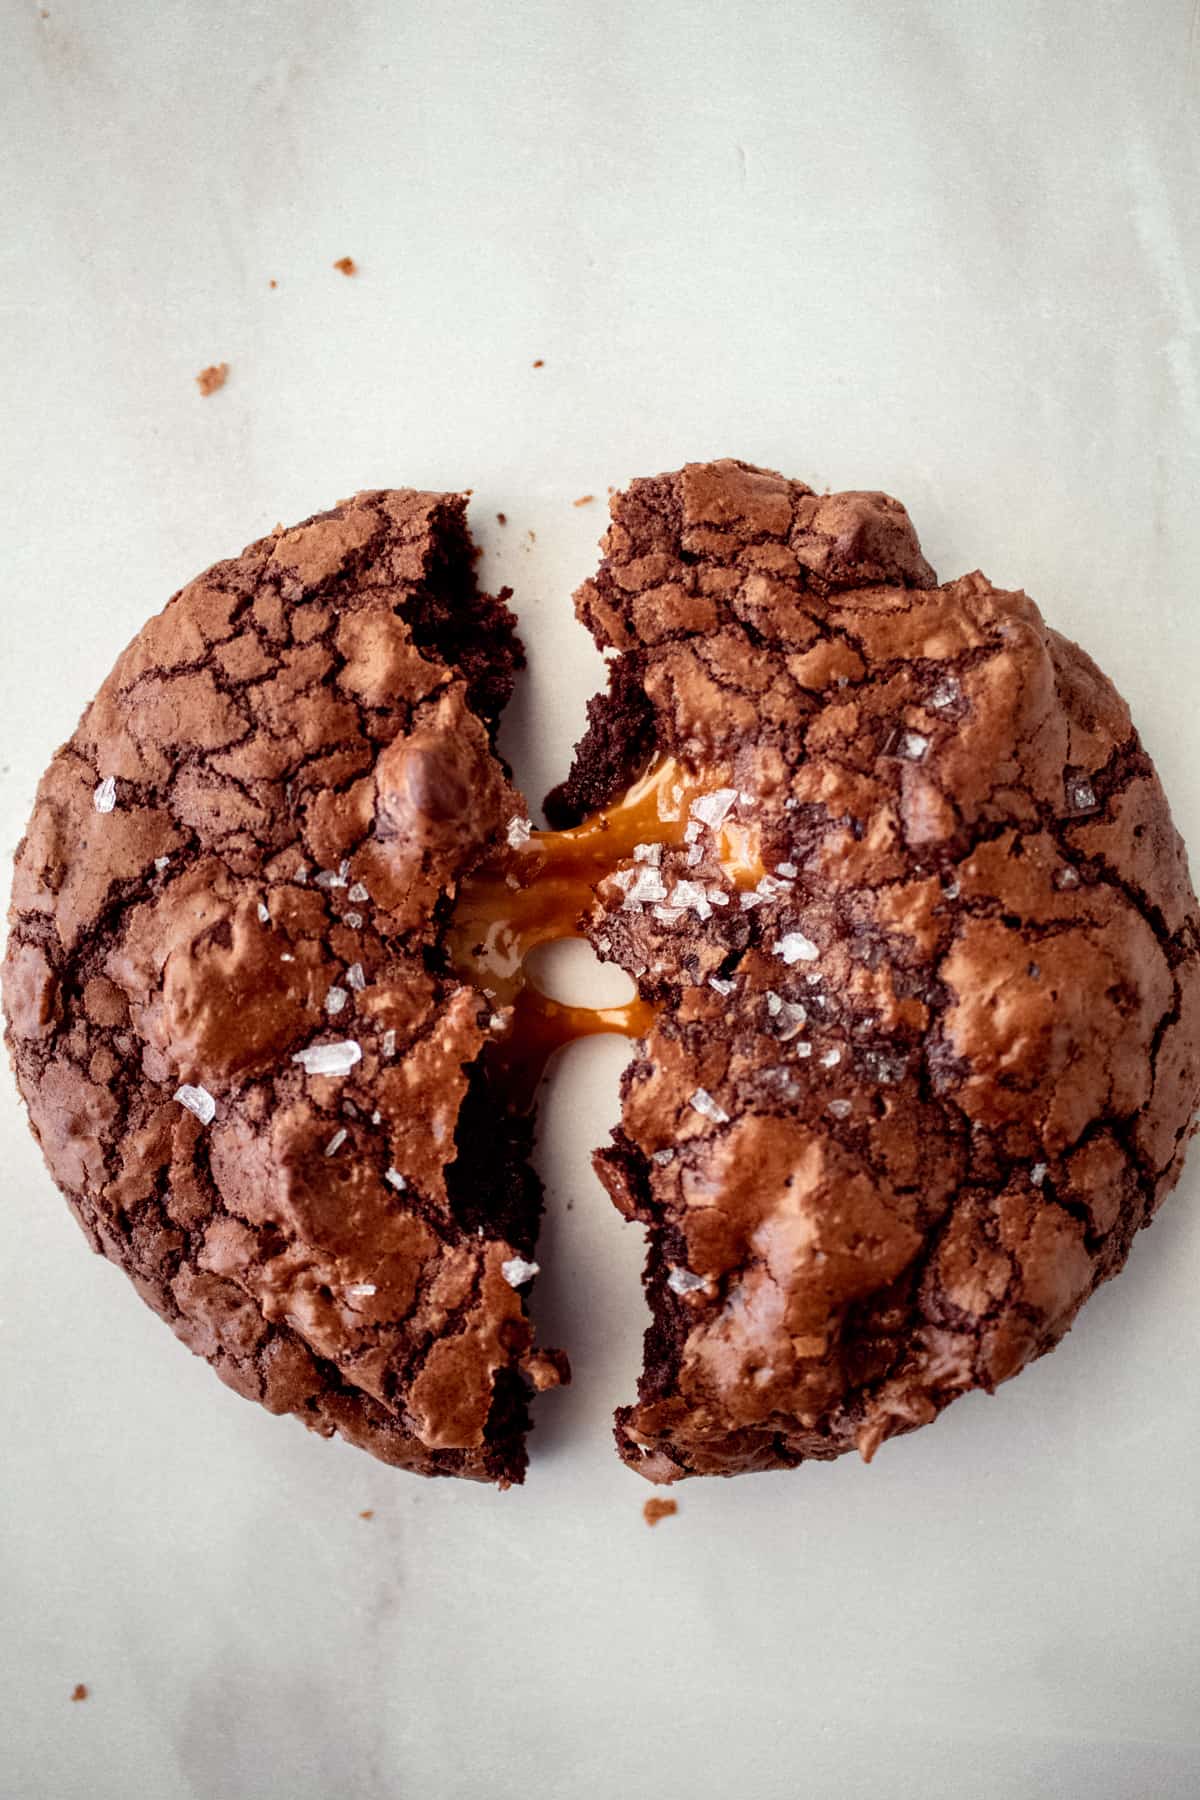
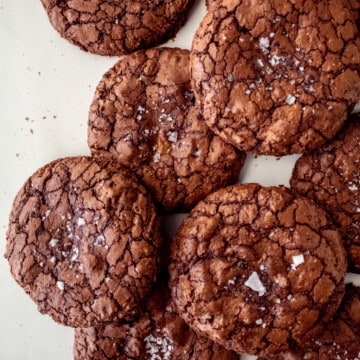
Chocoholics - this one is for you. If you're looking for a rich, fudgy, and gooey cookie, look no further. These brownie crinkle cookies are the best of a brownie - a crackly top, with a soft and fudgy interior in cookie form, and filled with gooey caramel and topped with flaky sea salt.
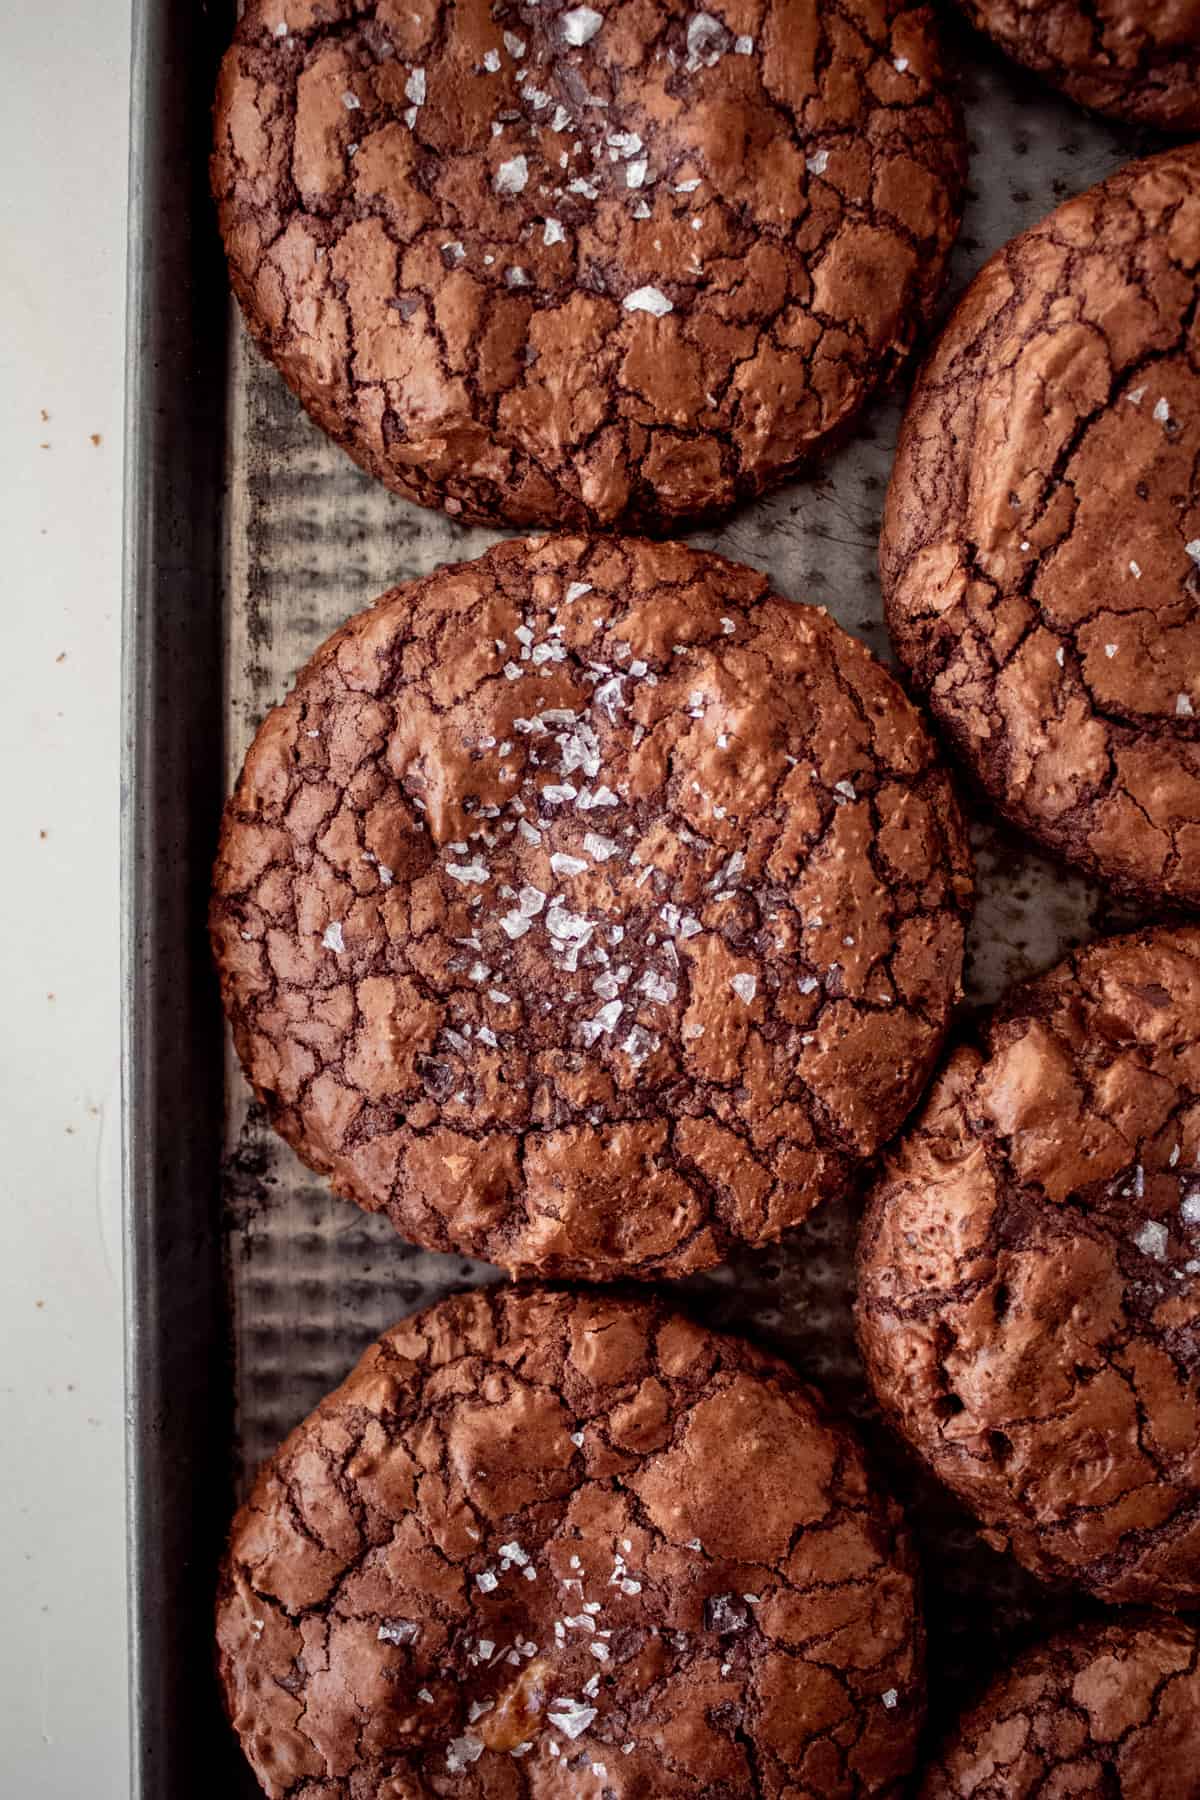
These cookies are packed with chocolate. They've got the rich and chocolatey flavor of a chocolate truffle but with just enough flour to keep the dough together and give them their brownie-like texture.
Why You Will Love This Recipe
- Easy and simple to make.
- Melt in your mouth, fudgy and gooey on the inside, with a crackly, chewy, brownie-like exterior.
- No chilling required.
- Easy to follow recipe with step by step photo instructions.
Recipe Ingredients
Bittersweet Chocolate - chopped or chips, I use Ghirardelli chocolate bars.
All purpose flour
Unsweetened cocoa powder - natural
Baking powder
Fine sea salt
Unsalted butter - room temperature
Granulated sugar
Eggs - room temperature
Vanilla extract
Chocolate chips - semisweet or bittersweet
Chewy caramels - I recommend using Kraft or Werther's Originals Chewy Caramels, but any chewy caramel will do. Flattening the caramels into a disc shape before stuffing into the cookie batter allows it to melt more evenly.
Flaky salt - for sprinkling on top of the cookies
Recipe Instructions
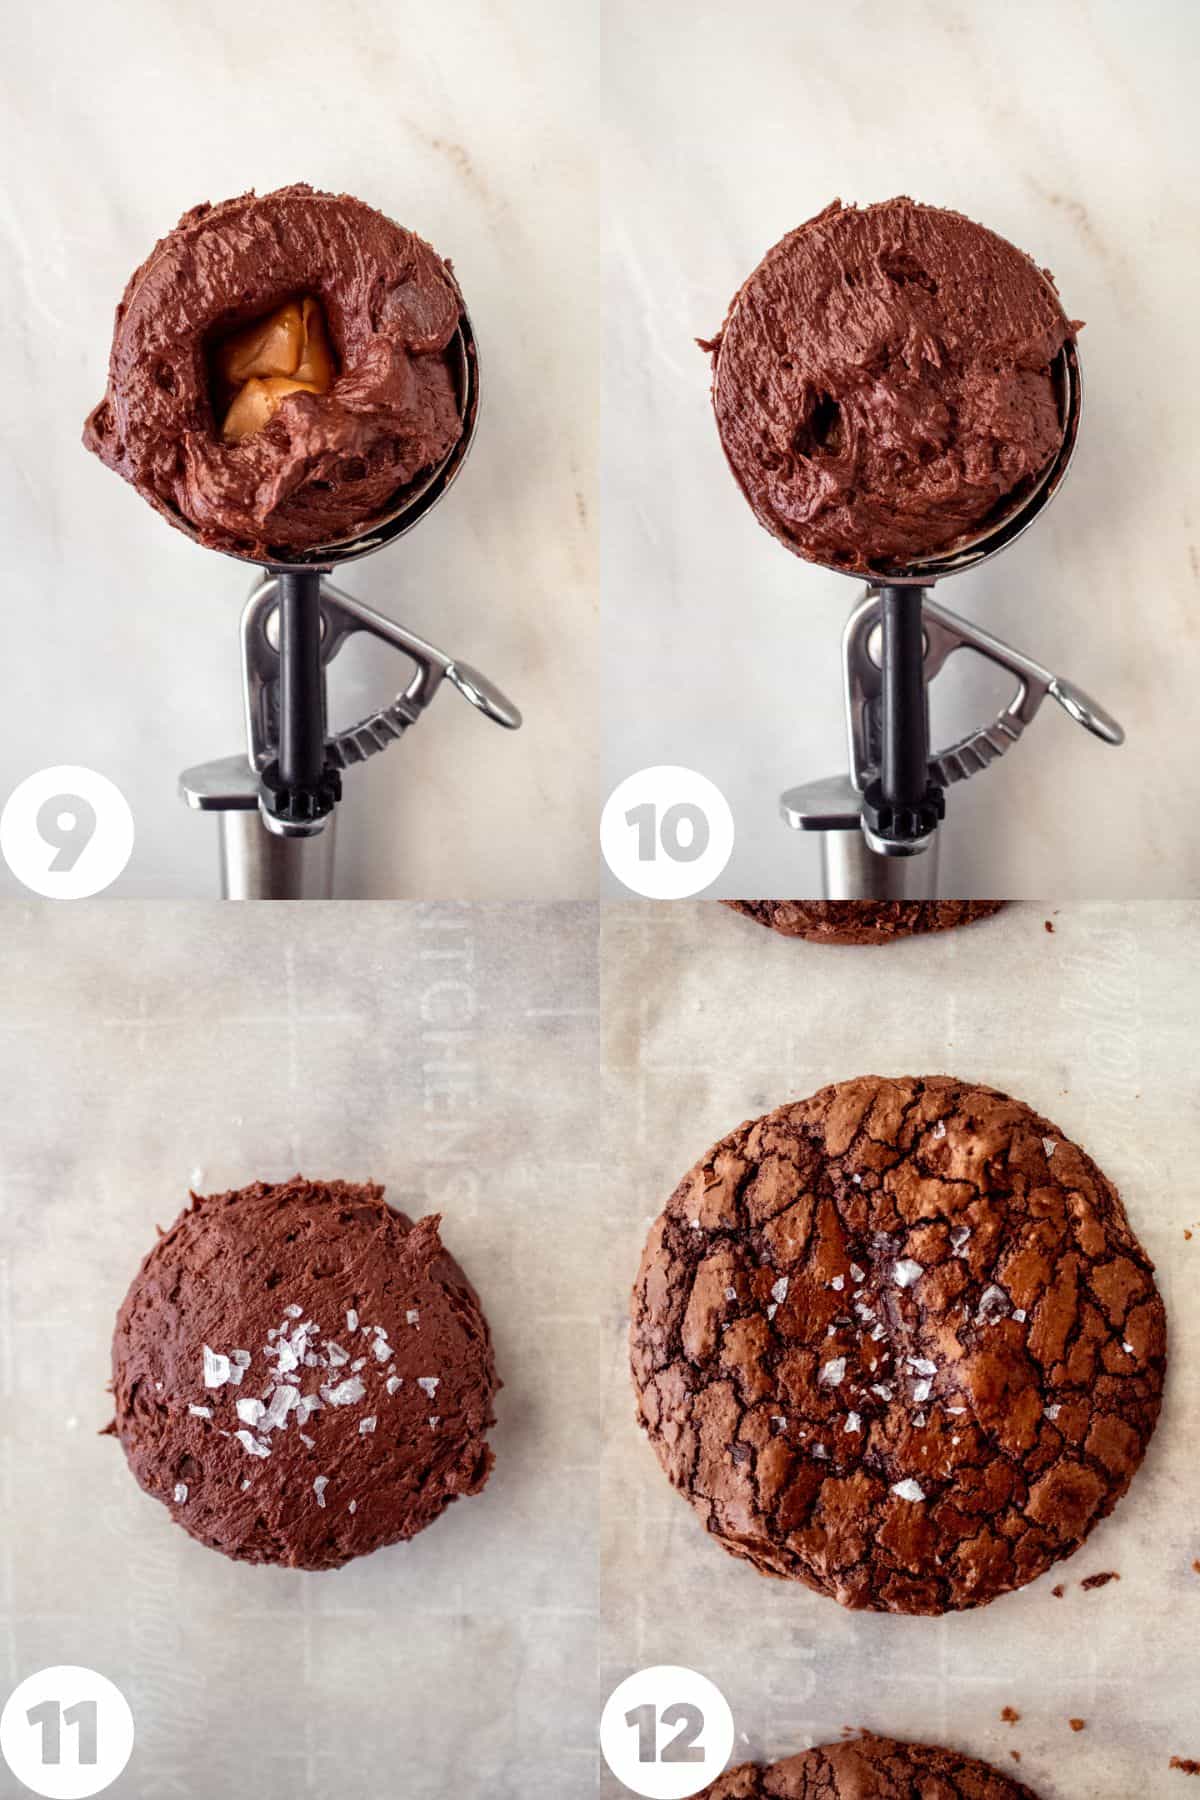
Before beginning the recipe, preheat your oven to 350F and line two large cookie sheets with parchment paper. Remove the caramels from their wrappers. Flatten them slightly with the bottom of a glass or measuring cup.
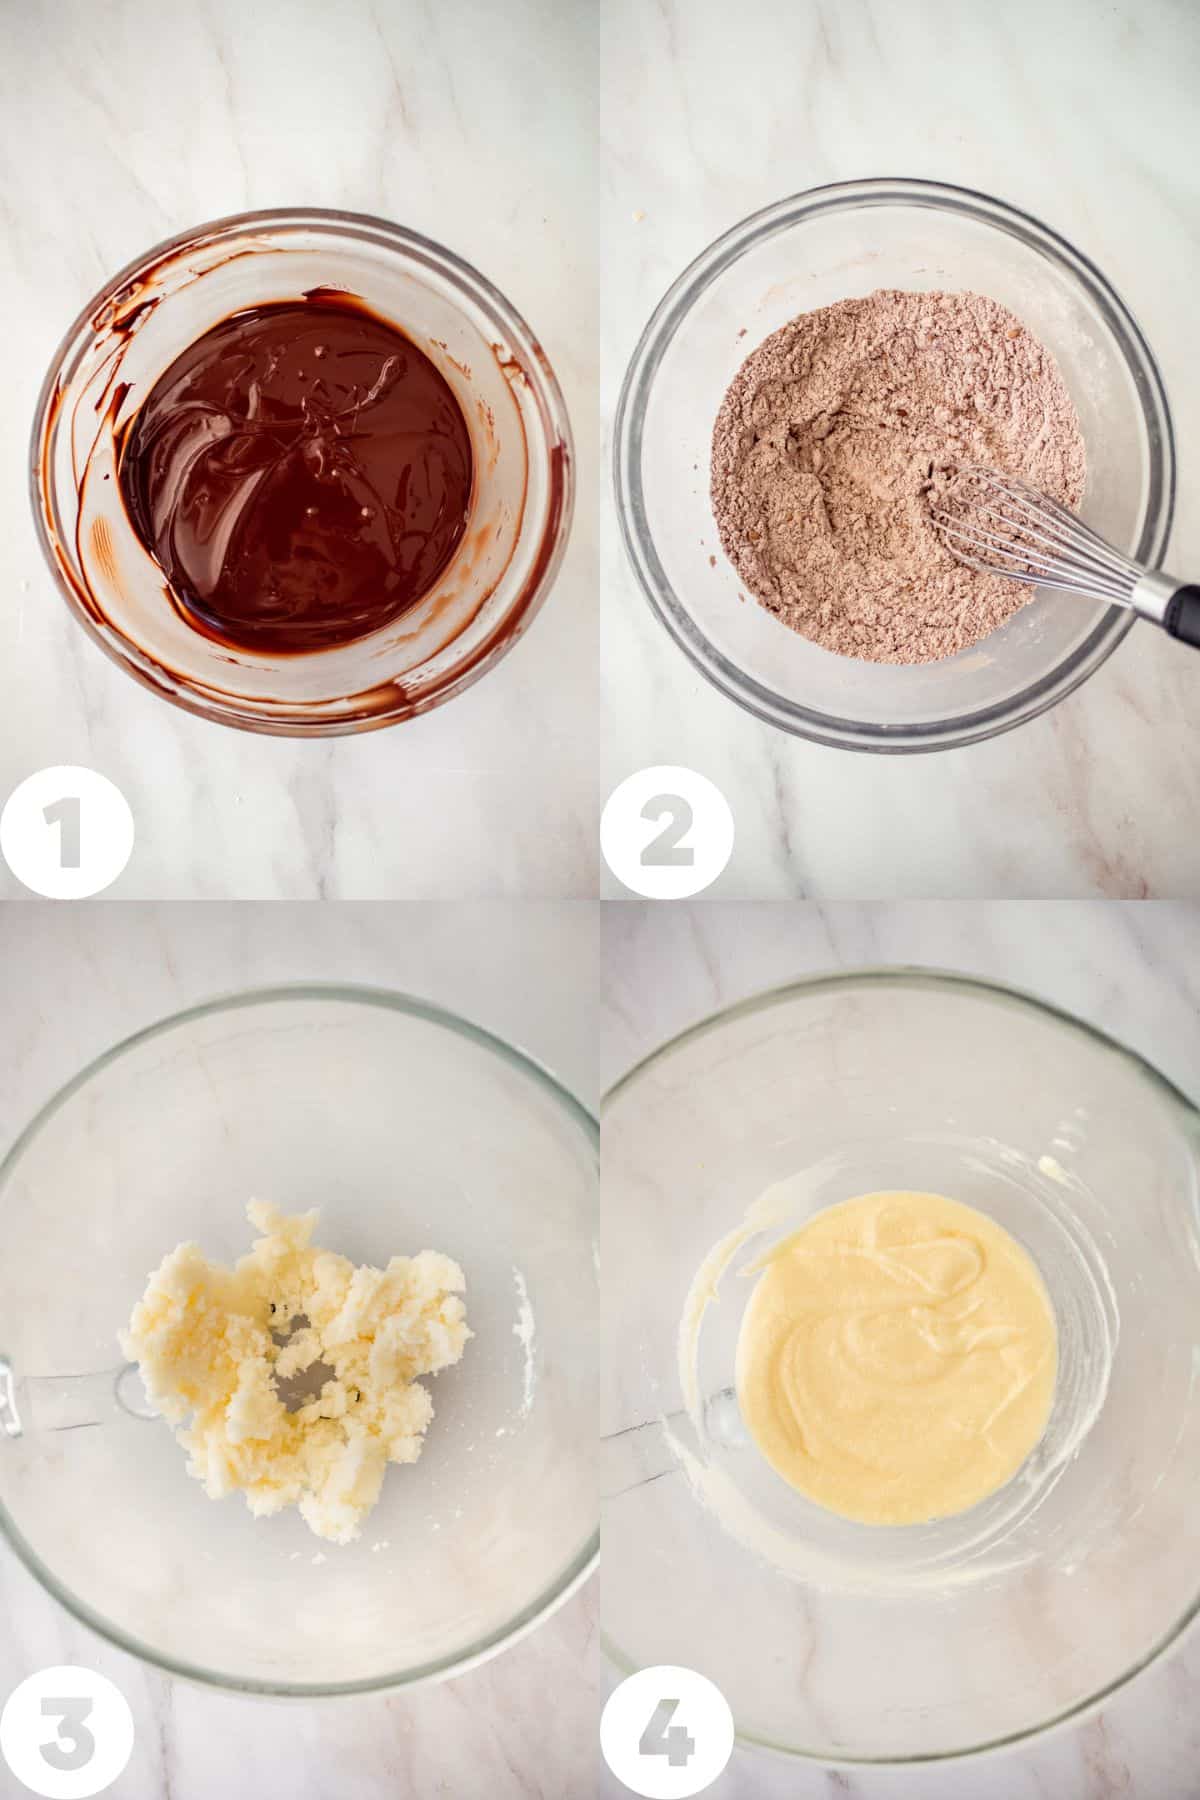
- Microwave the bittersweet chocolate in 30 second increments, stirring after each, until melted and smooth. Set aside.
- Whisk together the flour, cocoa powder, baking powder and salt, breaking up any lumps.
- Beat the butter and sugar together in the bowl of a stand mixer until light and fluffy.
- Beat in the eggs, one at a time. Increase the speed to high and beat for an additional 1-2 minutes until light and creamy. This helps contribute to the crackly tops.
- Beat in the cooled chocolate and vanilla extract.
- Beat in the flour mixture until just combined.
- Stir in the chocolate chips.
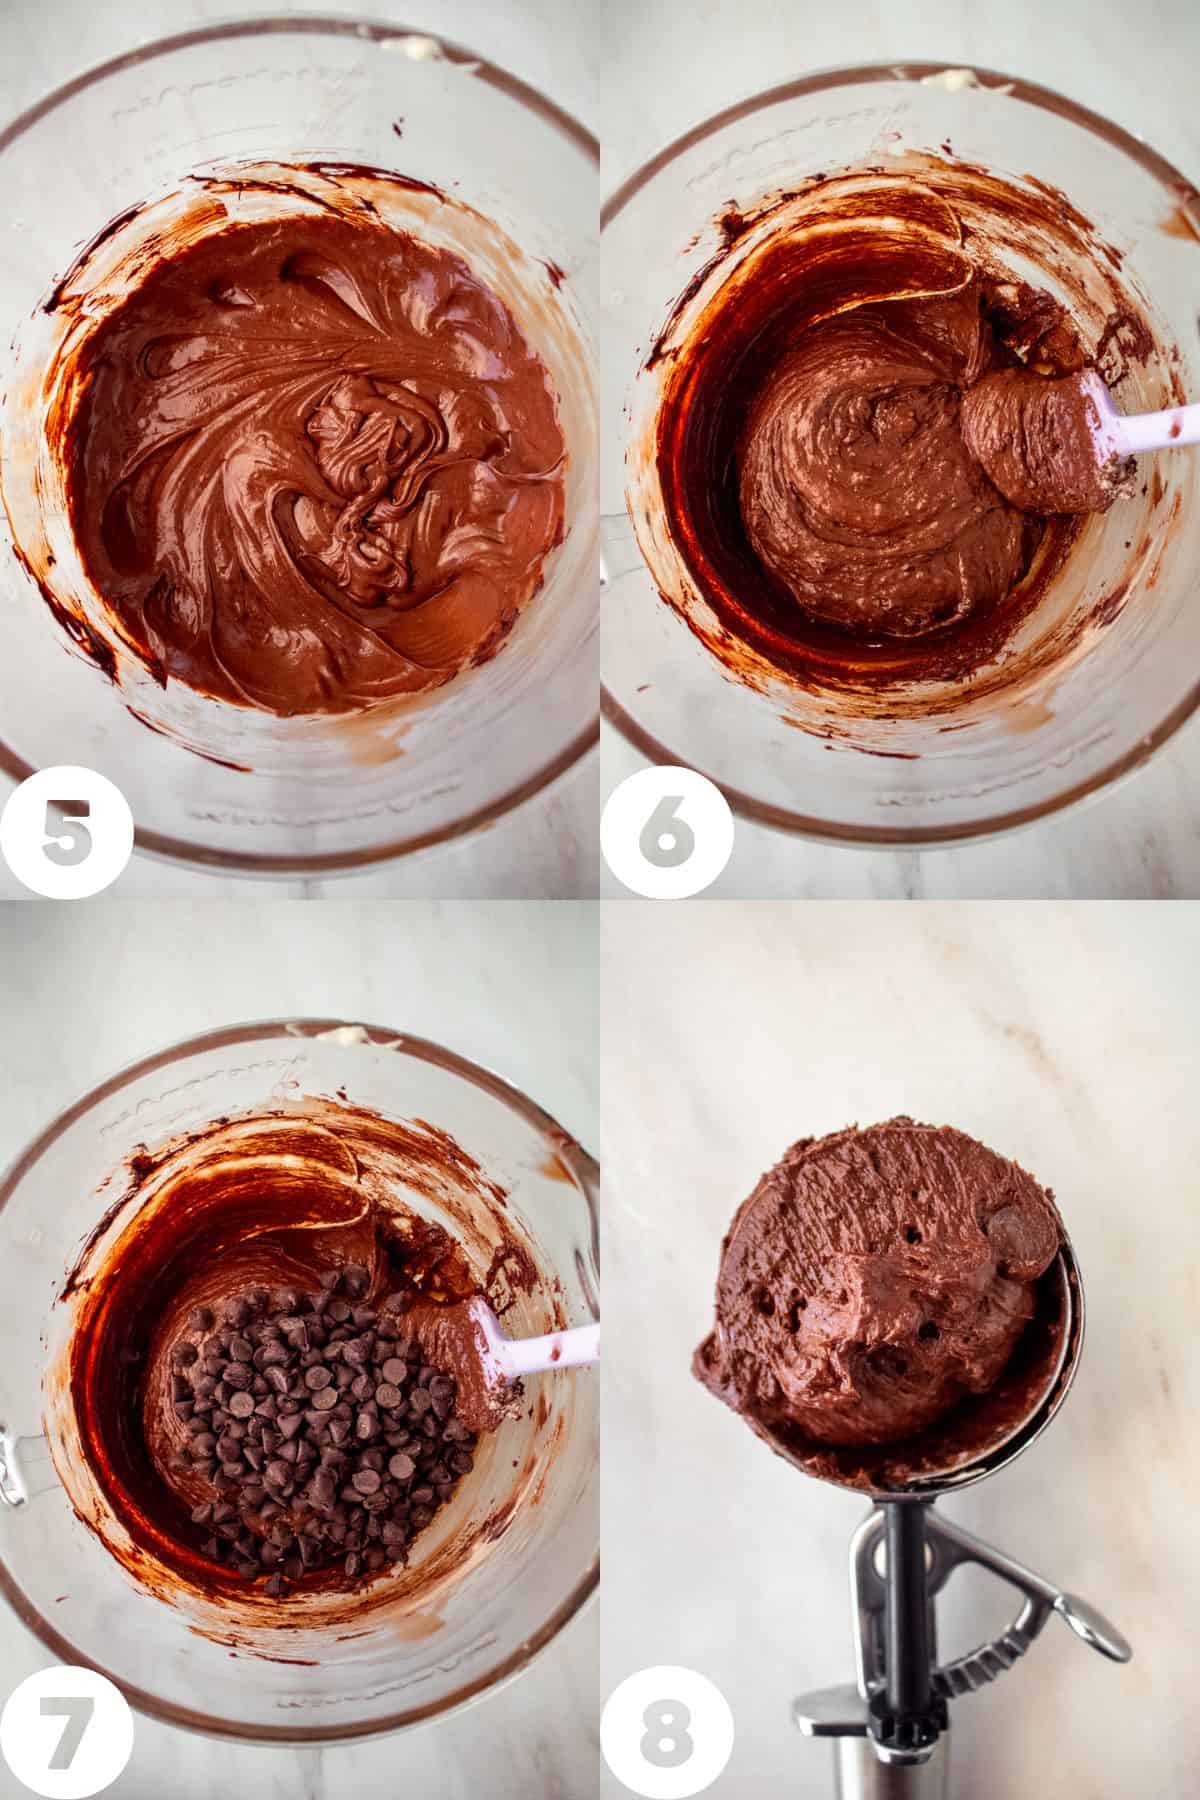
You'll notice the dough seems a bit wet, almost like brownie batter, but it will start to firm up quickly, so don't let the dough sit too long before scooping out the cookies.
- Scoop enough dough to fill ⅔ of the scoop.
- Push the caramel into the center of the scoop.
- Scoop more dough to cover up the caramel and fill the scoop.
- Place the scooped cookies on to the cookie sheets - 6 on each.
- Bake the cookies for 14-16 minutes until they have crackly tops and look just set, but not wet. Don't over bake or they will lose their soft and fudgy brownie-like centers.
Baking Tips
- Make sure your butter and eggs are room temperature so that the mixture doesn't split. A cold mixture could also result in seized chocolate when the melted chocolate is added.
- The main flavor of these cookies is chocolate so be sure to choose the best bittersweet chocolate within your budget. Ghirardelli or Guittard are good grocery store brands to use.
- Don't refrigerate this dough as it will get too hard to scoop as the chocolate will turn solid, and they won't spread properly. I used a large 2oz scoop, but you can also use ¼ cup measuring cup to scoop out the cookies.
- This recipe makes big, bakery style cookies but you can make smaller cookies if you wish. Use a 1oz/2 tablespoon scoop and half of a caramel to make 24 smaller cookies. Reduce the baking time to 10-12 minutes.
Storage and Freezing
Store these cookies in an airtight container for up to 2-3 days. I like to pop them in the microwave for 10-15 seconds to warm them up and melt the caramel before serving.
Unfortunately, the cookie dough can not be made in advance. They will harden and won't spread right in the oven. Luckily, they don't take very long to make and they're so so worth it.
Baked cookies can be frozen, stored in an airtight container for up to 3 months.
Recipe FAQs
These cookies shouldn't spread too thin in the oven. Be sure to bake on the center rack of your oven. Rotating the pan halfway through baking will also help. It's also always good to keep an oven thermometer in your oven to ensure that your oven is running at the right temperature.
There's a couple things can cause cookies not to spread. Be sure to not chill the dough, and be sure to bake right after scooping. Flattening them slightly before baking helps get them to spread and to spread more evenly.
The dough should be sticky after mixing in the chocolate chips. When flattening the cookies, you can dampen your hands to keep the dough from sticking too much. It'll firm up as you continue to scoop the cookies.
If you make these brownie crinkle cookies, let me know! Drop a comment or tag me on Instagram. I love seeing your bakes and creations.
Enjoy!
Ash xx
More Cookie Recipes to Try
Espresso Toffee Chocolate Chunk Cookies
Brown Butter Pumpkin Spice Snickerdoodles
Pistachio Cherry Linzer Cookies
Recipe
Brownie Crinkle Cookies
Ingredients
- 12 chewy caramels
- 1 ¾ cups bittersweet chocolate
- ½ cup + 2 tablespoons all purpose flour
- 2 tablespoons unsweetened cocoa powder
- ¼ teaspoon baking powder
- ¼ teaspoon fine sea salt
- 5 tablespoons unsalted butter, room temperature
- 1 cup granulated sugar
- 3 large eggs, room temperature
- 2 teaspoons pure vanilla extract
- ¾ cup semi or bittersweet chocolate chips
- flaky sea salt
Instructions
- Preheat the oven to 350F and line two cookie sheets with parchment paper.
- Remove the caramels from their wrappers. Flatten the caramels, to about ½" thick with the bottom of glass.12 chewy caramels
- Place the chocolate in a microwave safe bowl, and microwave in 30 second increments until mostly melted. Stir until smooth and melted. Set aside to cool to room temperature.1 ¾ cups bittersweet chocolate
- In a medium bowl, whisk together the flour, cocoa powder, baking powder and salt.½ cup + 2 tablespoons all purpose flour, 2 tablespoons unsweetened cocoa powder, ¼ teaspoon baking powder, ¼ teaspoon fine sea salt
- In the bowl of a stand mixer fitted with the paddle attachment, beat the butter and sugar on medium speed until light and fluffy, about 3-4 minutes.5 tablespoons unsalted butter, room temperature, 1 cup granulated sugar
- Add the eggs, one at a time, beating until well incorporated, scraping the bowl after each addition.3 large eggs, room temperature
- Increase the speed to high and beat until light and creamy, about 1-2 minutes.
- On low speed, beat in the chocolate and vanilla extract and mix until just combined.2 teaspoons pure vanilla extract
- Add the flour mixture and beat until just combined.
- Remove the bowl from the stand mixer and fold in the chocolate chips. The batter will be a bit sticky, but work fast because it will start to firm up quickly.¾ cup semi or bittersweet chocolate chips
- With a large (2oz/1/4 cup) cookie scoop, scoop enough of the cookie dough to fill ⅔ of the scoop. Press one of the caramels into the dough.
- Scoop more dough to cover up the caramel and fill the scoop.
- Scoop the cookies and place them on to the cookie sheets - 6 on each, leaving at least 2 inches in between each cookie.
- Flatten each cookie slightly with your hand. The dough will be sticky. Sprinkle the cookies with flaky sea salt.flaky sea salt
- Bake the cookies for 14-16 minutes until they are crackly and look just set on top. If you are baking in batches do not refrigerate or the cookies will not spread as they should.
- Transfer the cookies to cooling racks. These cookies are best served warm.
Sheba says
Hi there! If I wanted to make them just a little smaller what size scoop or cup should I use?
Ashley says
Hi Sheba! I would use a 2tbsp size scoop and only 1/2 of a caramel. -Ash
Sheba says
Thank you!
Shenoa says
Had real problems with this recipe. I used the 1/4 cup to scoop and my cookies turned out gargantuan and the caramel didn't spread at all so I have an 1.5 inches of cookie all around and then a caramel center that didn't melt at all. For all the work these cookies took I'm pretty bummed. Not to mention in trying to get them off the pan I sprayed liberally mind you, all the centers popped out and/or broke the cookie in half. 😭
Ashley says
Hi Shenoa. Hmm, let's see if we can troubleshoot what could have gone wrong. I did see that you used baking spray and not parchment paper as directed in step 1. Parchment paper helps cookies bake more evenly but also keeps them from spreading out too fast, which is likely why the cookies spread and cooked faster than the caramel melted. Caramel melts at 150F, so if it didn't melt, that tells me that everything around it baked too hot or too fast. These cookies should bake up to be large but also thicker with a hidden caramel center. Ash
Ashley says
All fixed! Sorry about that.