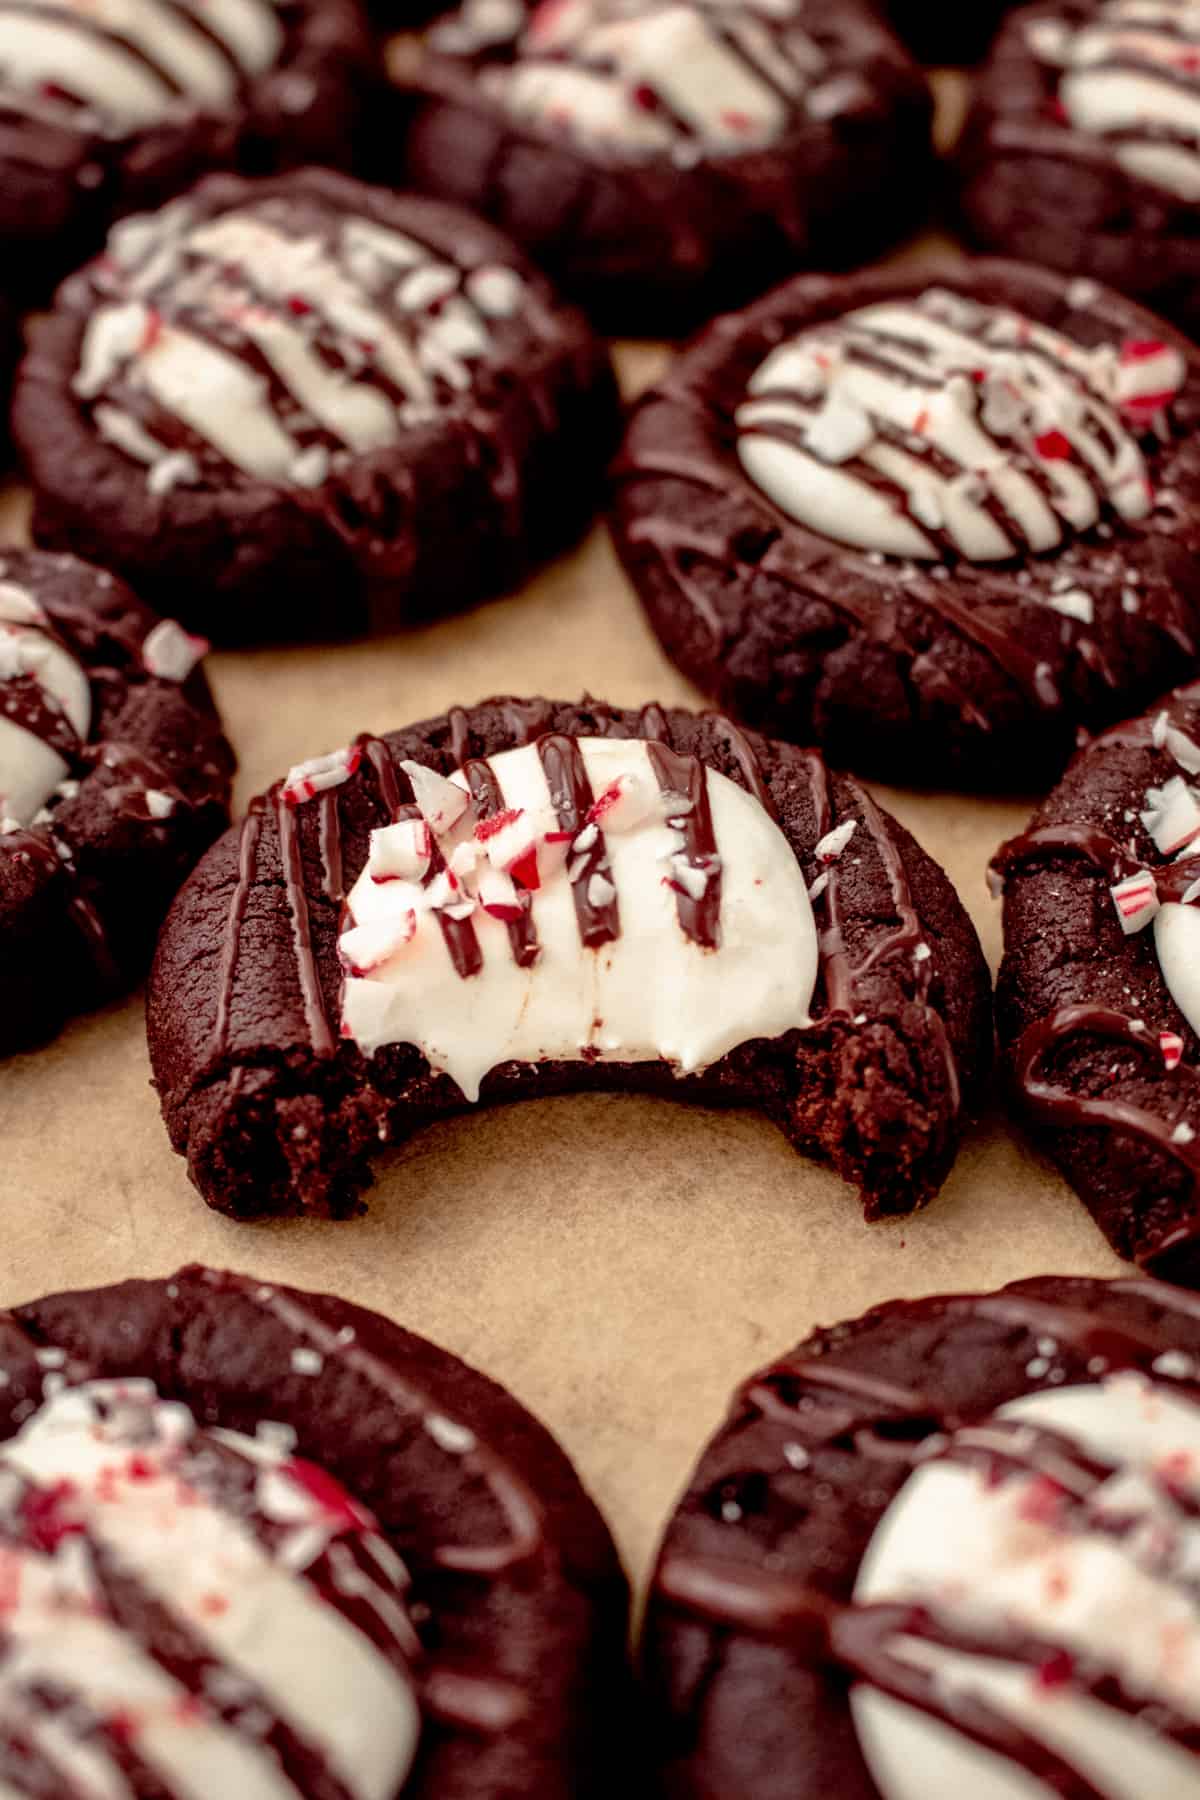
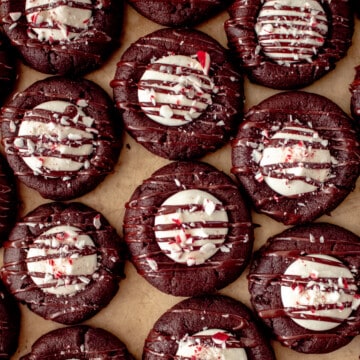
My chocolate marshmallow thumbprint cookies are fudgy, soft and chewy, filled with a creamy marshmallow fluff filling, drizzled with semi sweet chocolate and dressed up for the holidays with a sprinkle of crushed peppermint pieces.
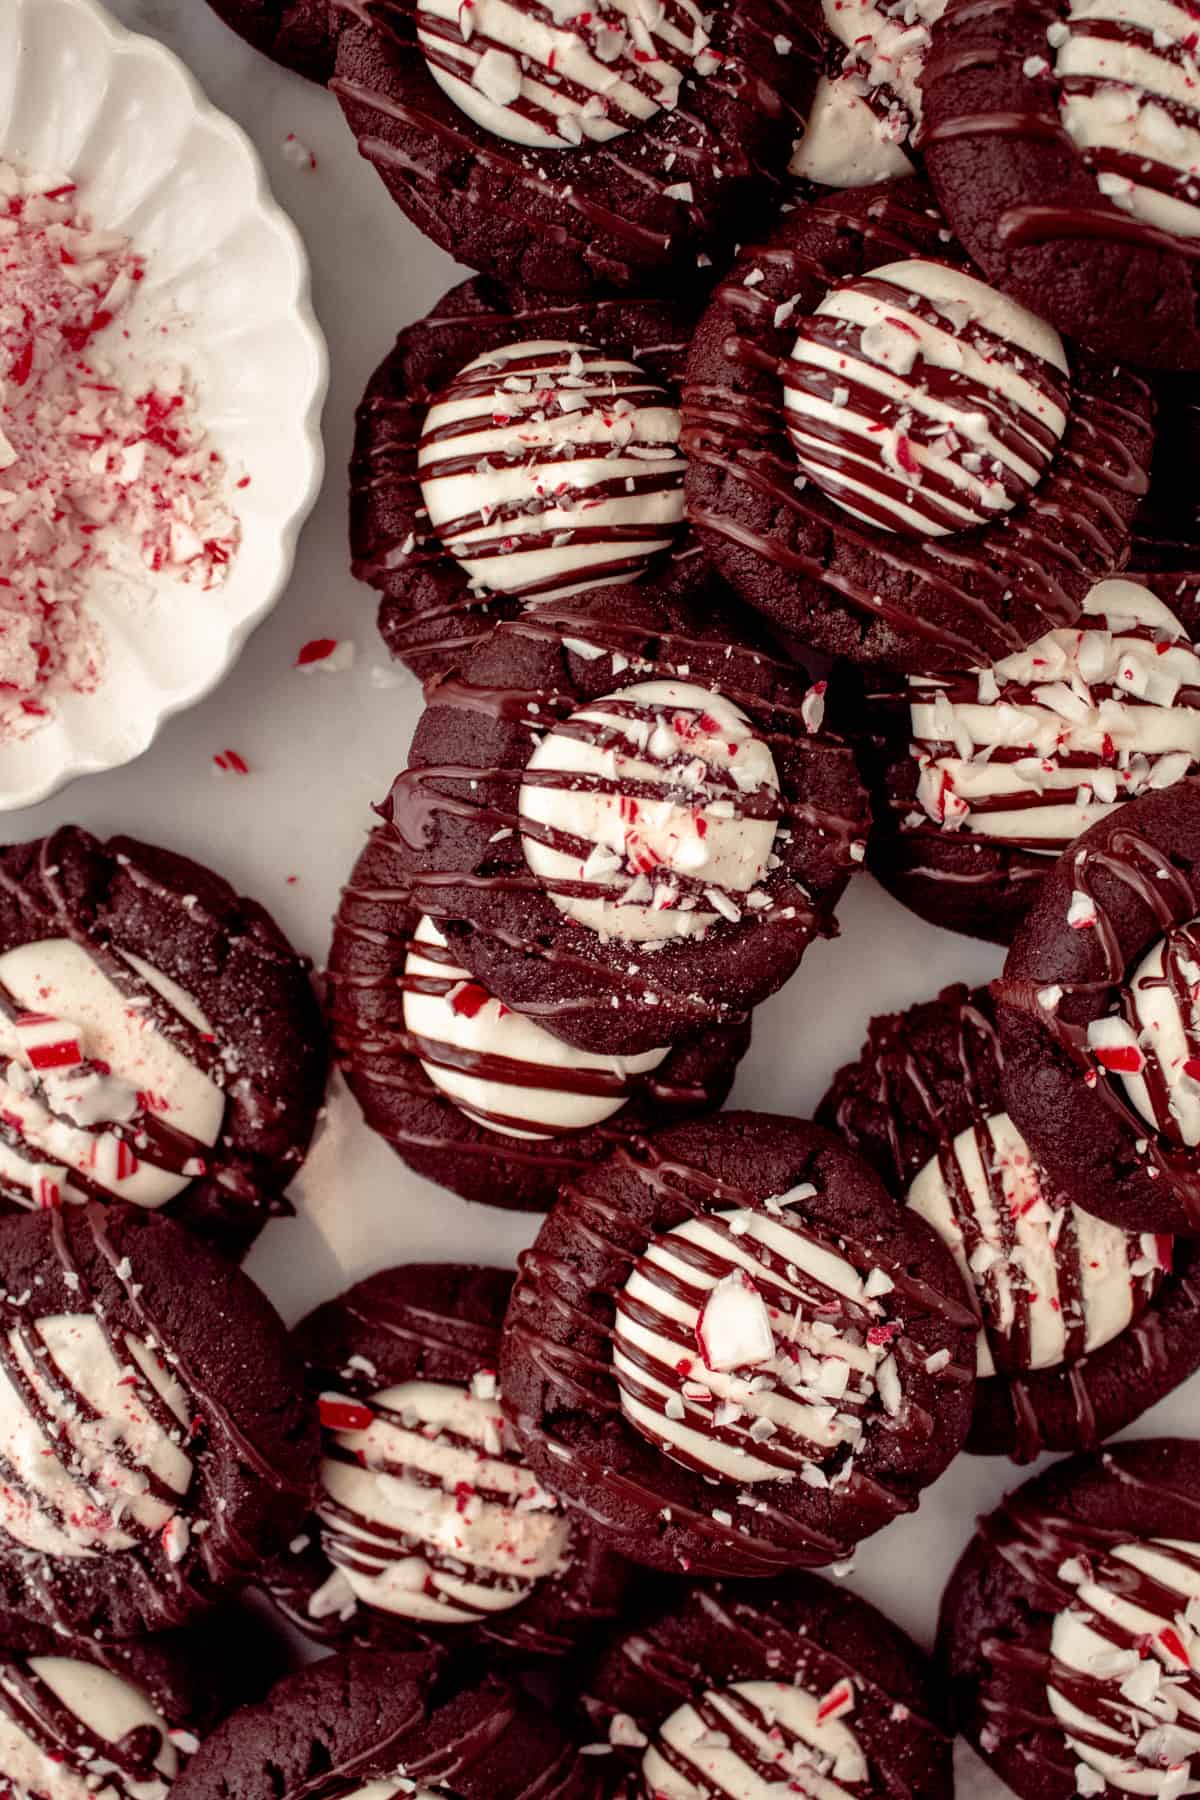
These cookies are melt in your mouth delicious, delightfully festive and definitely one to add to your holiday baking list.
Jump to:
Why You Will Love These Cookies
- They're full of rich, chocolate flavor; soft and chewy, with slightly crisp edges.
- The marshmallow filling is like a buttercream, creamy, smooth and fluffy.
- Though they have a few more steps than the average cookie recipe, they're surprisingly easy to make. I've given step by step photo instructions to help you make perfect cookies every time.
- Perfect for cookie exchanges and holiday gifts.
Recipe Ingredients
All purpose flour
Cocoa powder - Dutch processed, for dark and fudgy chocolate flavor
Fine sea salt
Baking powder
Instant espresso, or coffee - Coffee really enhances the chocolate flavor and gives it more depth.
Unsalted butter
Brown sugar
Granulated sugar
Egg yolks
Vanilla extract
Confectioners' sugar
Marshmallow Fluff - 7oz jar
Semi sweet chocolate - chopped or chips
Vegetable shortening (or coconut oil) - to help thin the chocolate for drizzling
Candy cane - Just one candy cane, crushed, to sprinkle over the tops of the cookies
Recipe Instructions
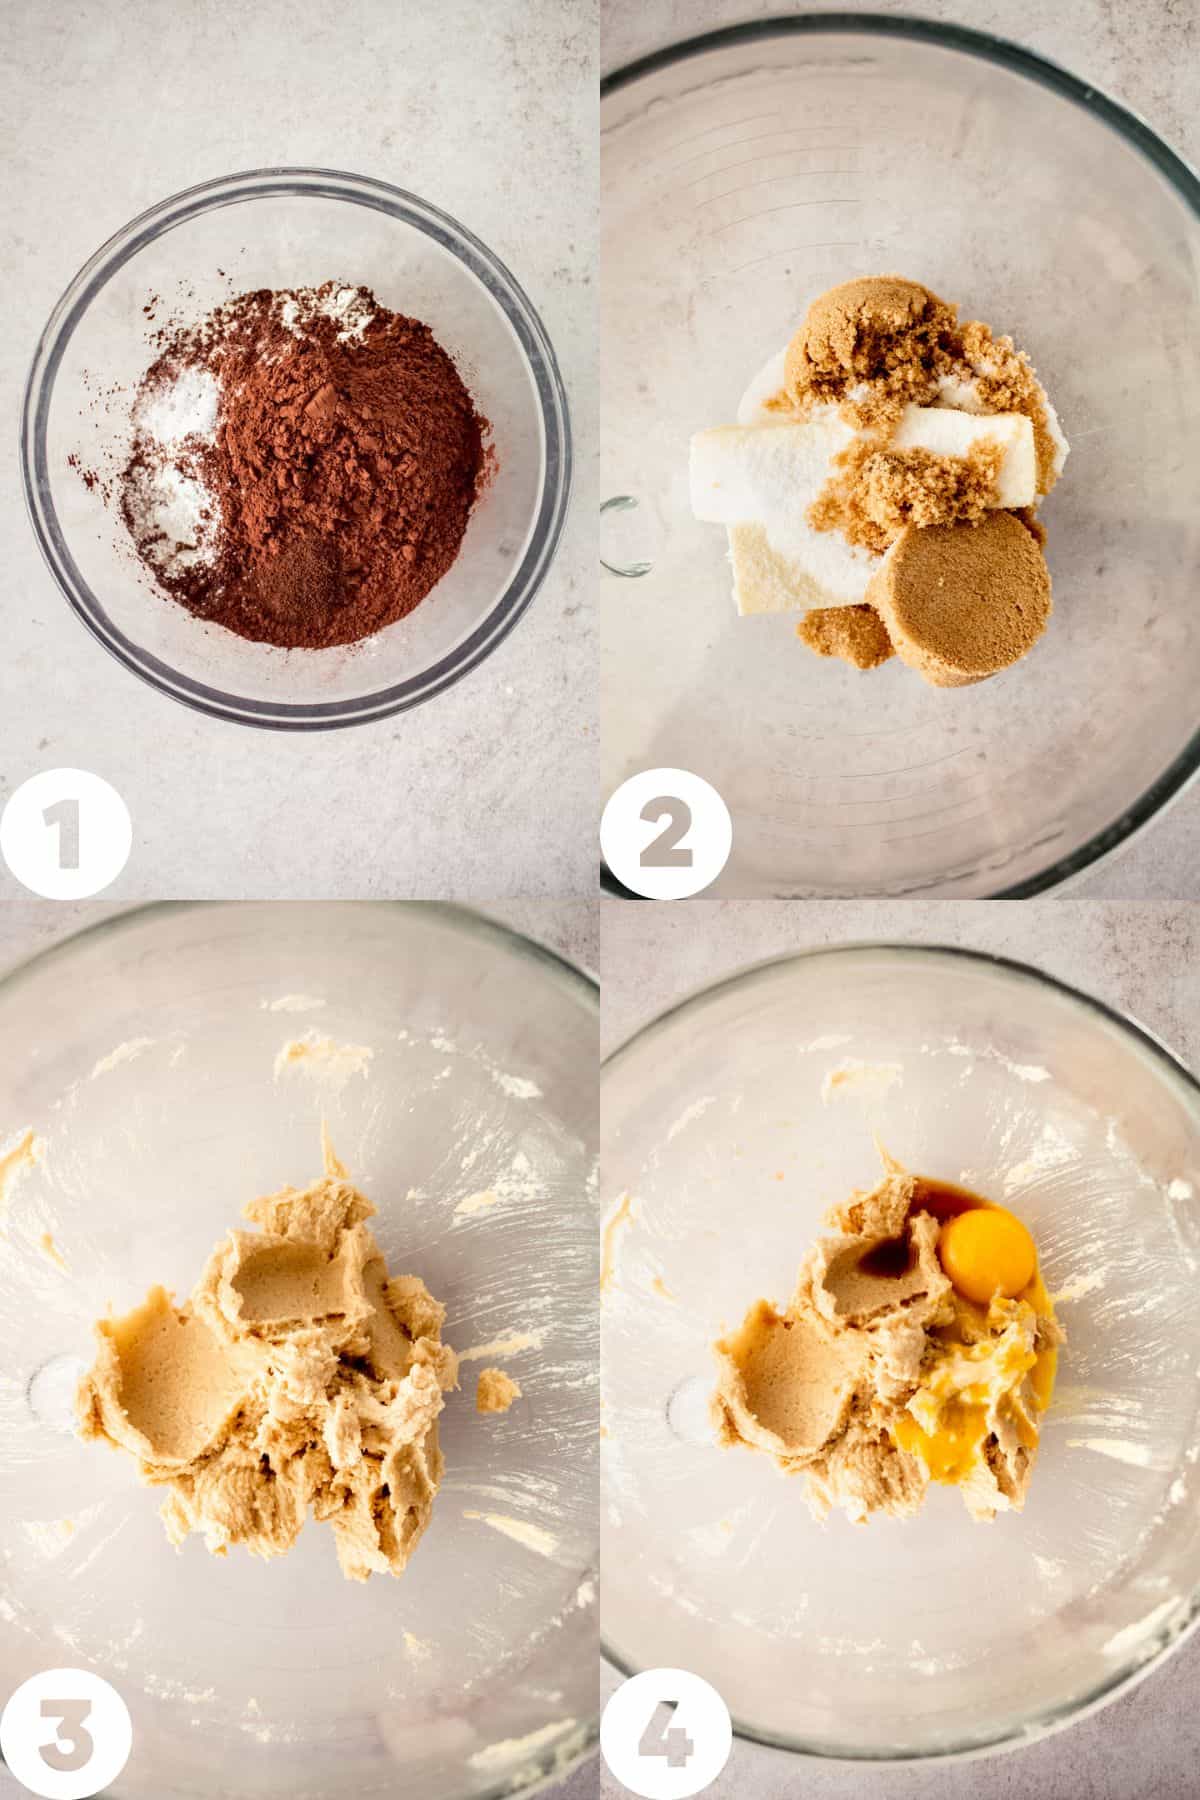
- Make the chocolate cookies. Whisk together the dry ingredients - flour, cocoa powder, baking powder, salt and instant espresso. Instant espresso or coffee is optional, but I think it makes these cookies taste even better.
- In the bowl of a stand mixer (you can also use a hand mixer), combine the butter, brown sugar and granulated sugar.
- Cream the mixture, until lightened and fluffy, about 3 minutes.
- Beat in the egg yolks and vanilla.
- Beat in the dry ingredients, until just combined.
- With a 1 tablespoon ice cream scoop, or a 1 tablespoon measuring spoon, portion and scoop the dough.
- Roll the scooped dough into balls.
- With the backside of a 1 teaspoon measuring spoon, create indentations in the center of the cookie dough balls. This is where the filling will go after the cookies are baked. You can also make the indentations with your thumb. Chill the dough for 30 minutes to firm up a bit before baking.
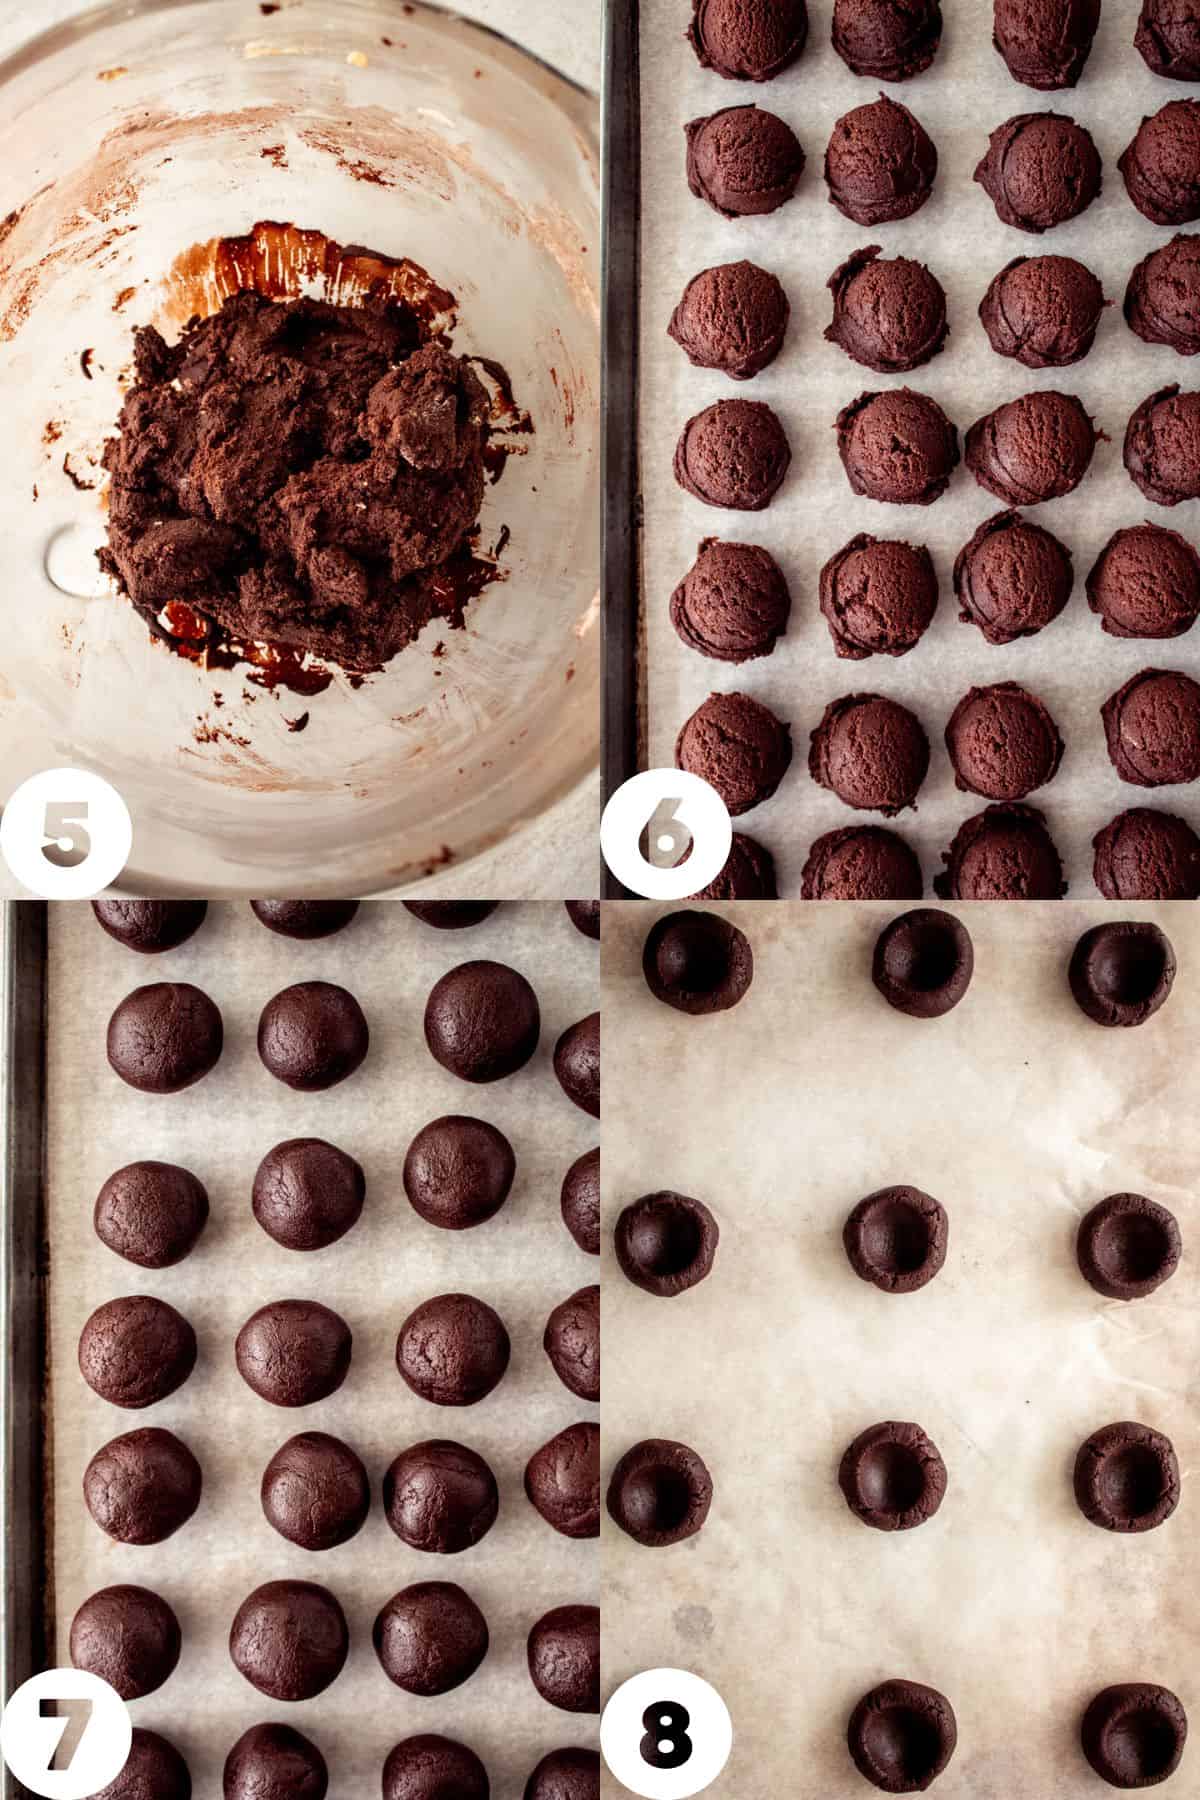
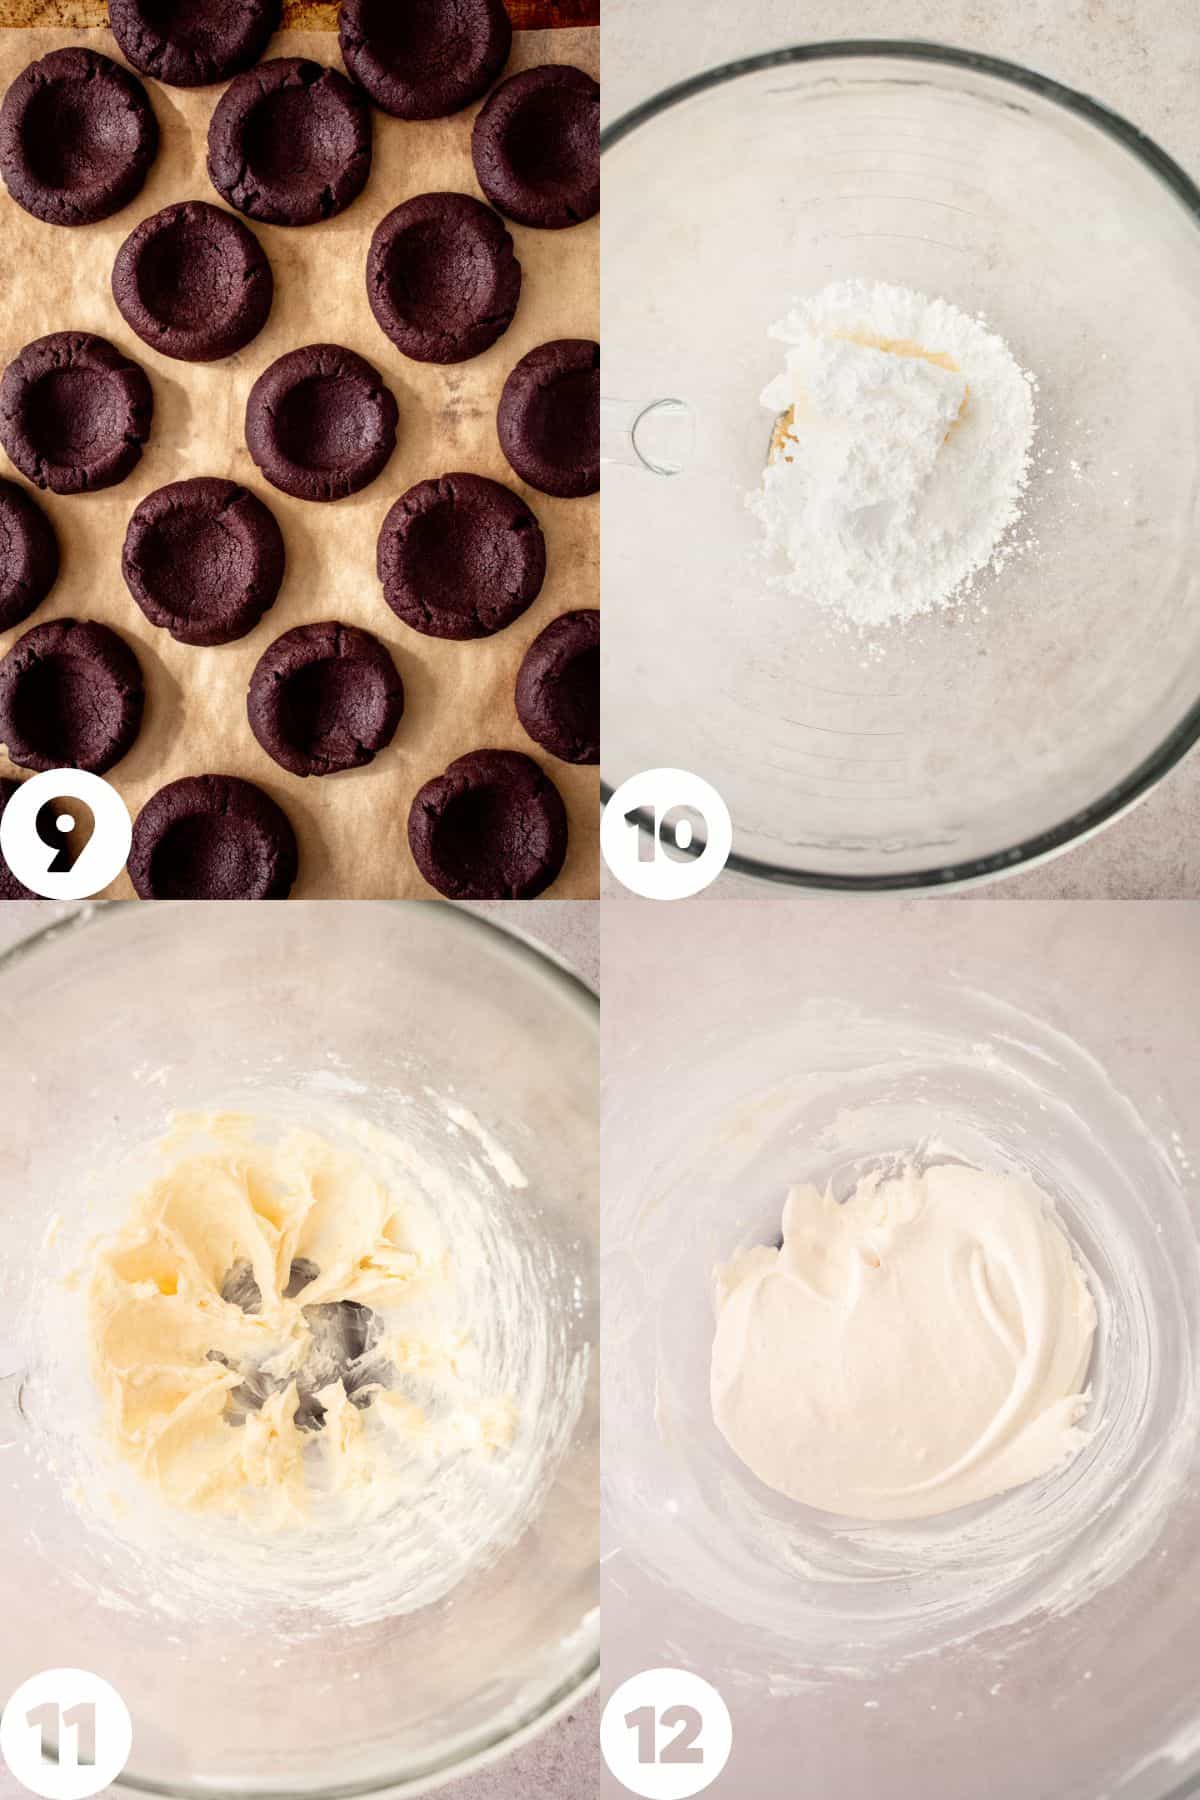
- Bake the cookies 9-11 minutes until the cookies look *just* set. Let the cookies cool completely while preparing the marshmallow filling. If the indentations puffed up a bit, gently press them back down with a 1 teaspoon measuring spoon.
- Make the marshmallow filling. In the bowl of a stand mixer, combine the butter, and confectioners' sugar.
- Beat until light and fluffy, about 3 minutes.
- Beat in the marshmallow fluff, vanilla and salt.
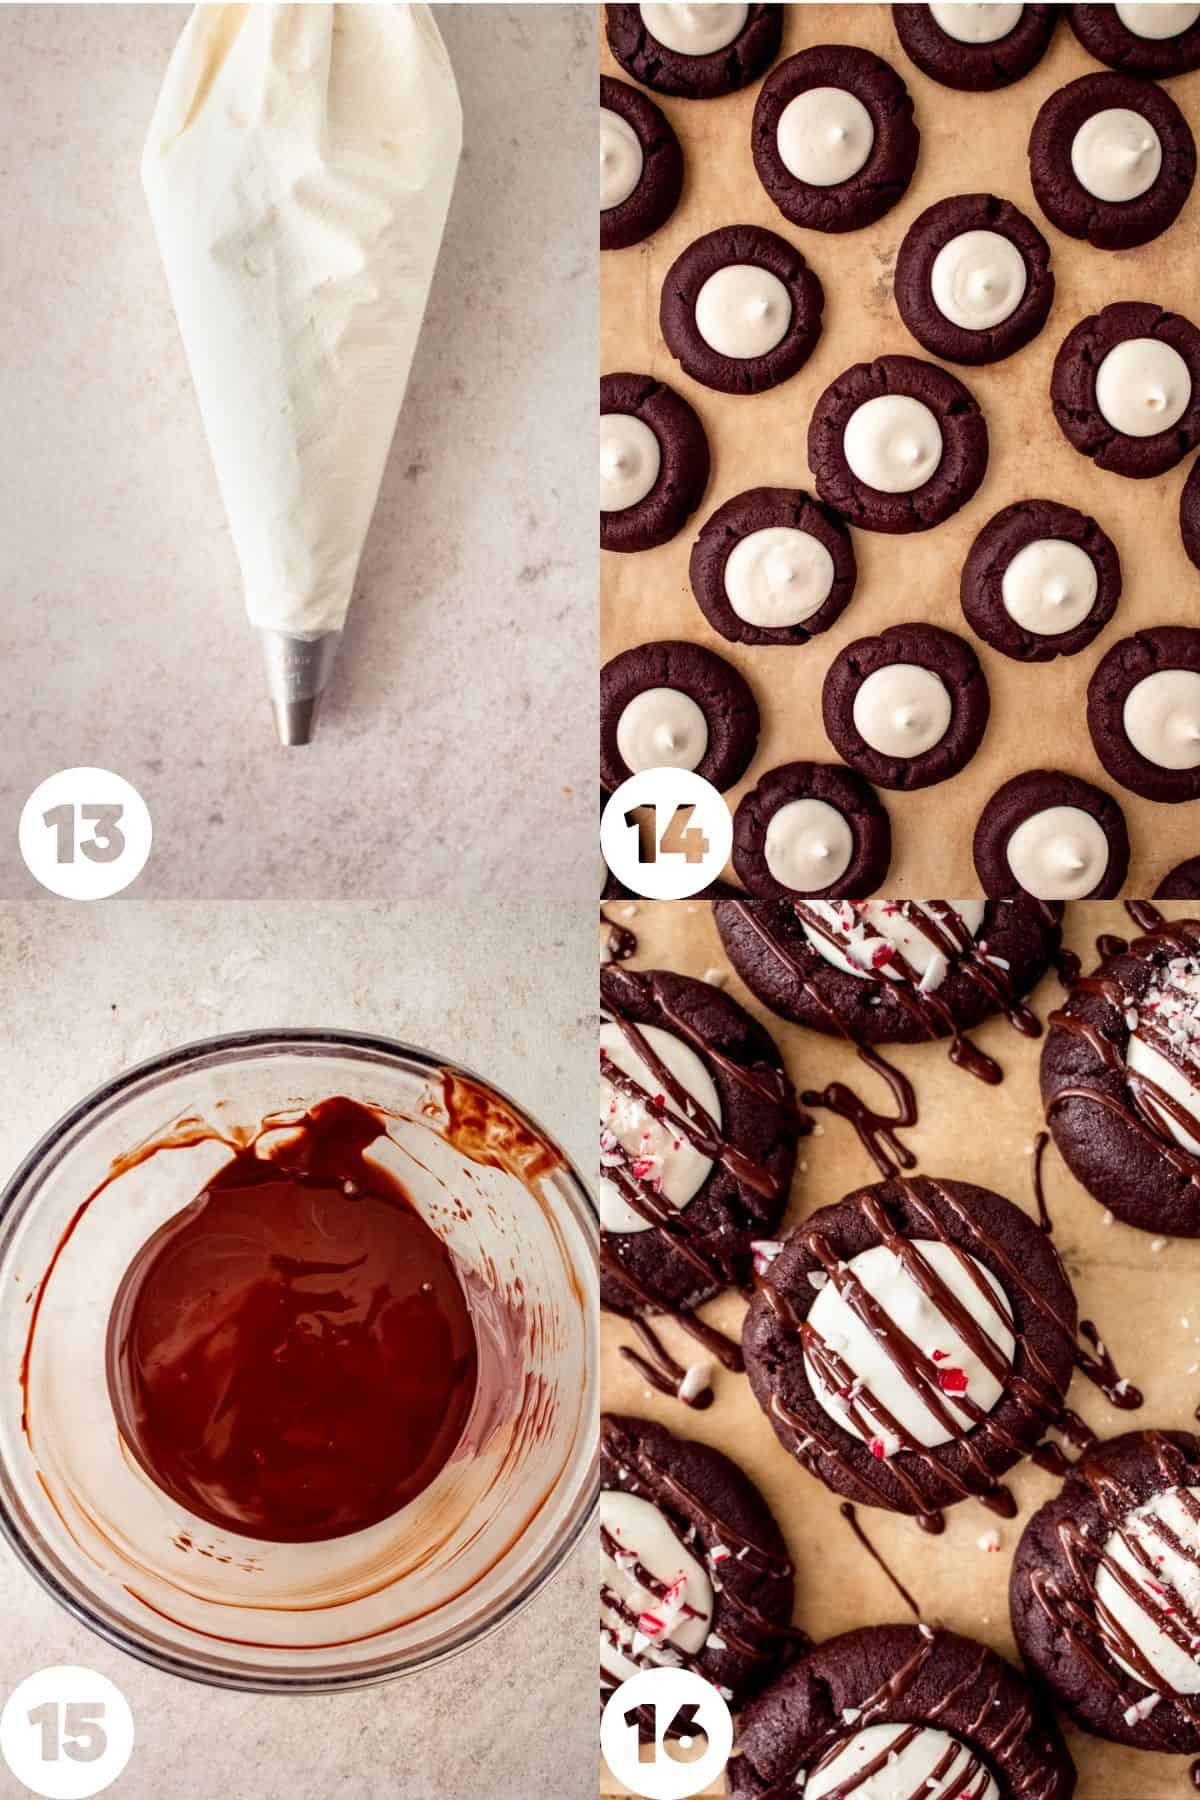
- Fit a piping bag with a medium round tip (#12) and fill the bag with the marshmallow filling. You can use a zip top bag and snip off the corner if you don't have piping bags and tips.
- Pipe the marshmallow filling in the center indentation of the cooled cookies.
- Decorate the cookies. Place the semi sweet chocolate and vegetable shortening in a small bowl. Melt the chocolate in 30 second increments in the microwave, stirring after each increment so the chocolate doesn't burn, until melted and smooth. If it's hot, let it cool a bit before drizzling so it won't melt the marshmallow filling.
- Pour the melted chocolate into a piping bag. You can also use a zip top bag. Snip just a bit off the corner and drizzle the cookies with the chocolate. Sprinkle with crushed peppermint.
Storage and Freezing
These cookies can be stored in an airtight container at room temperature for up to 3 days. You can store them in the refrigerator for up to 5 days. They are best served at room temperature.
Unbaked cookie dough balls can be stored in an airtight container and frozen for up to 3 months. I recommend freezing the unbaked cookies after the thumbprint has been made, so they can be baked directly from the freezer or fridge.
Tips for Perfect Cookies
- A little bit of cracking around the edges is expected when the cookies bake. To prevent lots of cracks in your cookies, smooth the edges with your fingers, shaping them, so there aren't cracks in the dough before baking them after you create the indentations.
- If you don't have a stand mixer, no worries. A hand mixer works just as well.
- Chocolate cookies can be hard to check for doneness due to not being able to see any color changes while baking. The cookies should look set around the edges and not raw in the middle.
Variations and Substitutions
Make these peppermint chocolate marshmallow thumbprints by adding ¼ teaspoon of peppermint extract to the marshmallow filling.
Not a fan of peppermint? Replace the peppermint candy with finely chopped, toasted nuts.
These cookies are incredibly versatile so you can fill them with caramel, jam, curds, nut butters and more.
FAQ's
Switch out the flour in this recipe for a gluten free baking blend. My preferred gluten free flour is Cup4Cup.
Yes. Only 30 minutes of chilling time is required for these cookies. This ensures that they keep their shape when baking and don't spread too much.
If you make these chocolate marshmallow thumbprint cookies, let me know! Drop a comment or tag me on Instagram. I love seeing your bakes!
Enjoy!
Ash xx
For more cookie recipes, check out these posts:
Cranberry Chai Thumbprint Cookies
Pistachio Cherry Linzer Cookies
Whiskey and Rye Chocolate Chip Cookies
Recipe
Chocolate Marshmallow Thumbprint Cookies
Ingredients
Chocolate Thumbprints
- 1 ⅓ cups all purpose flour
- ½ cup Dutch process cocoa powder
- ½ teaspoon baking powder
- ½ teaspoon fine sea salt
- ½ teaspoon espresso powder, or instant coffee, optional
- ¾ cup unsalted butter, room temperature
- ⅔ cup brown sugar
- ⅓ cup granulated sugar
- 2 large egg yolks
- 2 teaspoon pure vanilla extract
Marshmallow Filling
- 4 tablespoons unsalted butter, room temperature
- ½ cup confectioners' sugar
- 1 7oz jar marshmallow cream
- 1 teaspoon pure vanilla extract
- ⅛ teaspoon fine sea salt
- ½ cup semi sweet chocolate chips
- ½ teaspoon vegetable shortening, or coconut oil
- 1 candy cane, finely crushed
Instructions
Chocolate Thumbprint Cookies
- Preheat the oven to 350F. Line two cookie sheets with parchment paper.
- In a medium bowl, whisk together the flour, cocoa powder, baking powder, salt, and espresso powder.1 ⅓ cups all purpose flour, ½ cup Dutch process cocoa powder, ½ teaspoon baking powder, ½ teaspoon fine sea salt, ½ teaspoon espresso powder, or instant coffee, optional
- In the bowl of a stand mixer, cream the butter, brown sugar and granulated sugar, beating for about 3 minutes.¾ cup unsalted butter, room temperature, ⅔ cup brown sugar, ⅓ cup granulated sugar
- Beat in the egg yolks and vanilla.2 large egg yolks, 2 teaspoon pure vanilla extract
- Scrape down the sides and bottom of the bowl with a spatula.
- Beat in the flour/cocoa mixture, mixing just until combined.
- Portion out the dough using a 1 tablespoon ice cream scoop or measuring spoon.
- Roll the portioned dough into balls.
- Use the back of a ½ teaspoon measuring spoon, or your thumb to make indentations in the center of the dough balls.
- Chill the dough balls for 30 minutes.
- Bake for 9-11 minutes, until the cookies look just set.
- If the cookies poof up a bit in the center, use a 1 teaspoon measuring spoon to gently make the thumbprint shape again.
- Allow cookies to cool on the baking sheet for 5 minutes before transferring to a wire rack to cool completely.
Marshmallow Filling
- In the bowl of a stand mixer, beat together the butter and confectioners' sugar for 2-3 minutes, until lightened and fluffy.4 tablespoons unsalted butter, room temperature, ½ cup confectioners' sugar
- Beat in the marshmallow fluff, vanilla and salt until well combined.1 7oz jar marshmallow cream, 1 teaspoon pure vanilla extract, ⅛ teaspoon fine sea salt
- Fit a piping bag with #12 round tip. Spoon the marshmallow filling into the bag. A zip top bag with the corner cut off also will work to pipe and fill the cookies.
- Pipe and fill the cookies with the marshmallow cream.
- In a small bowl, microwave the chocolate and shortening in 30 second increments, stirring after each, until smooth and melted.½ cup semi sweet chocolate chips, ½ teaspoon vegetable shortening, or coconut oil
- Fill another piping bag with the melted chocolate. Snip off just a small corner of the bag and drizzle the cookies with the chocolate.You can also fill a zip top bag with melted chocolate and snip off the corner to drizzle on the chocolate.
- Sprinkle the cookies with crushed peppermint pieces.1 candy cane, finely crushed
- Store leftover cookies at room temperature in an airtight container for up to 4 days.
Comments
No Comments