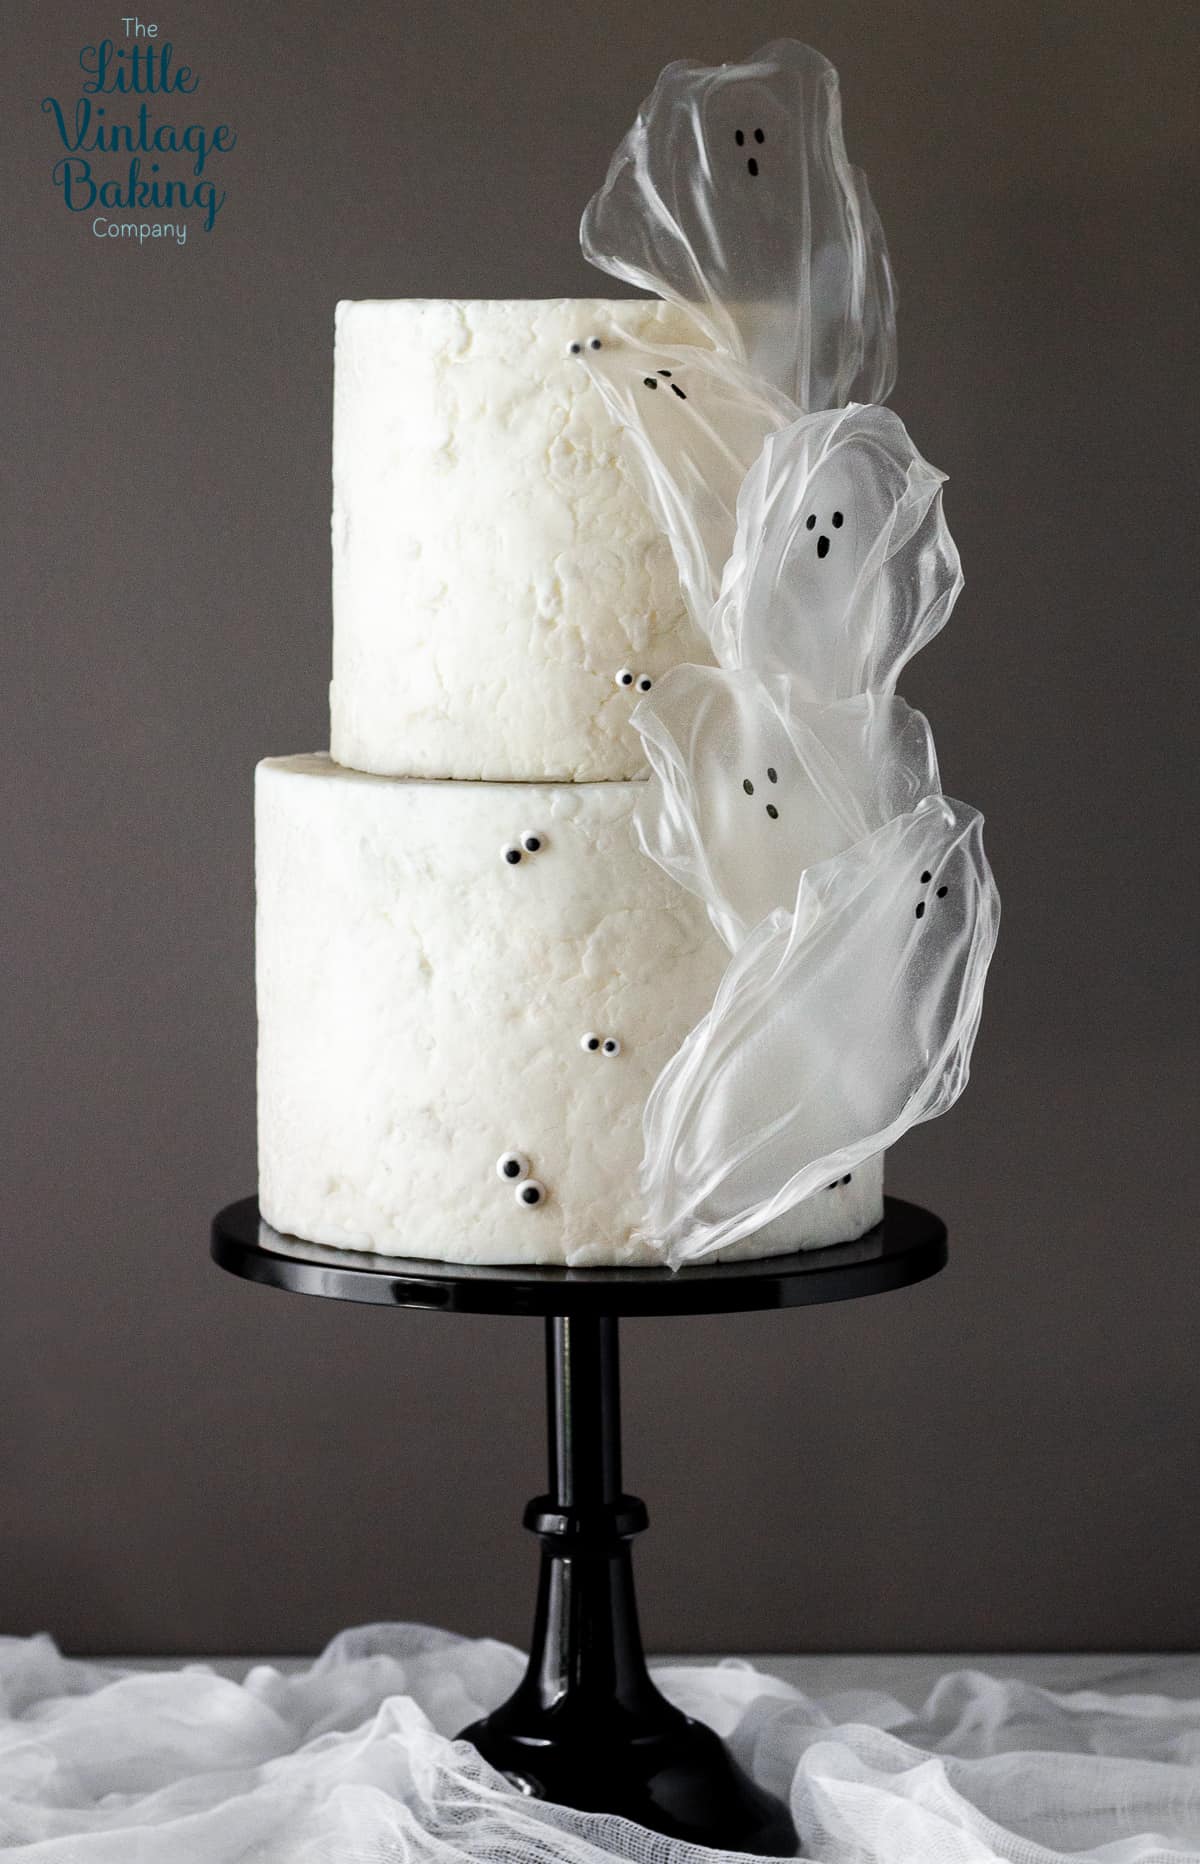
Rice paper sails are super popular on cakes these days. Understandably so, as they really add a lot of movement and an ethereal feel to a cake design. If you haven't used rice paper for cake decorating, you may have still heard of rice paper elsewhere - perhaps in the form spring rolls. For this tutorial, the same rice paper used to make spring rolls will be used to make these translucent Halloween ghosts. Luckily, rice paper can be found in most grocery stores and is fairly inexpensive. These Halloween rice paper ghosts are really easy to make, are a super cute addition on Halloween cakes and cupcakes, and and require very few supplies.
Supplies
-a small spray bottle filled with cold water
-non-stick mats/silicone mats
-styrofoam cake dummy
-straight pins
-lollipop sticks
About rice paper
Rice paper is easy to shape when wet, becoming stretchy and a bit sticky, and dries hard. Rice paper is commonly used in making rice paper sails for cakes, which is a similar technique, but shaped different. Usually, when making rice paper sails, the rice paper is submerged into water for a bit to thoroughly saturate it before shaping it. I find that method makes the paper too wet and more prone to ripping. With my method, the paper is moistened little by little until it's pliable, and easy to shape.
How to make rice paper ghosts
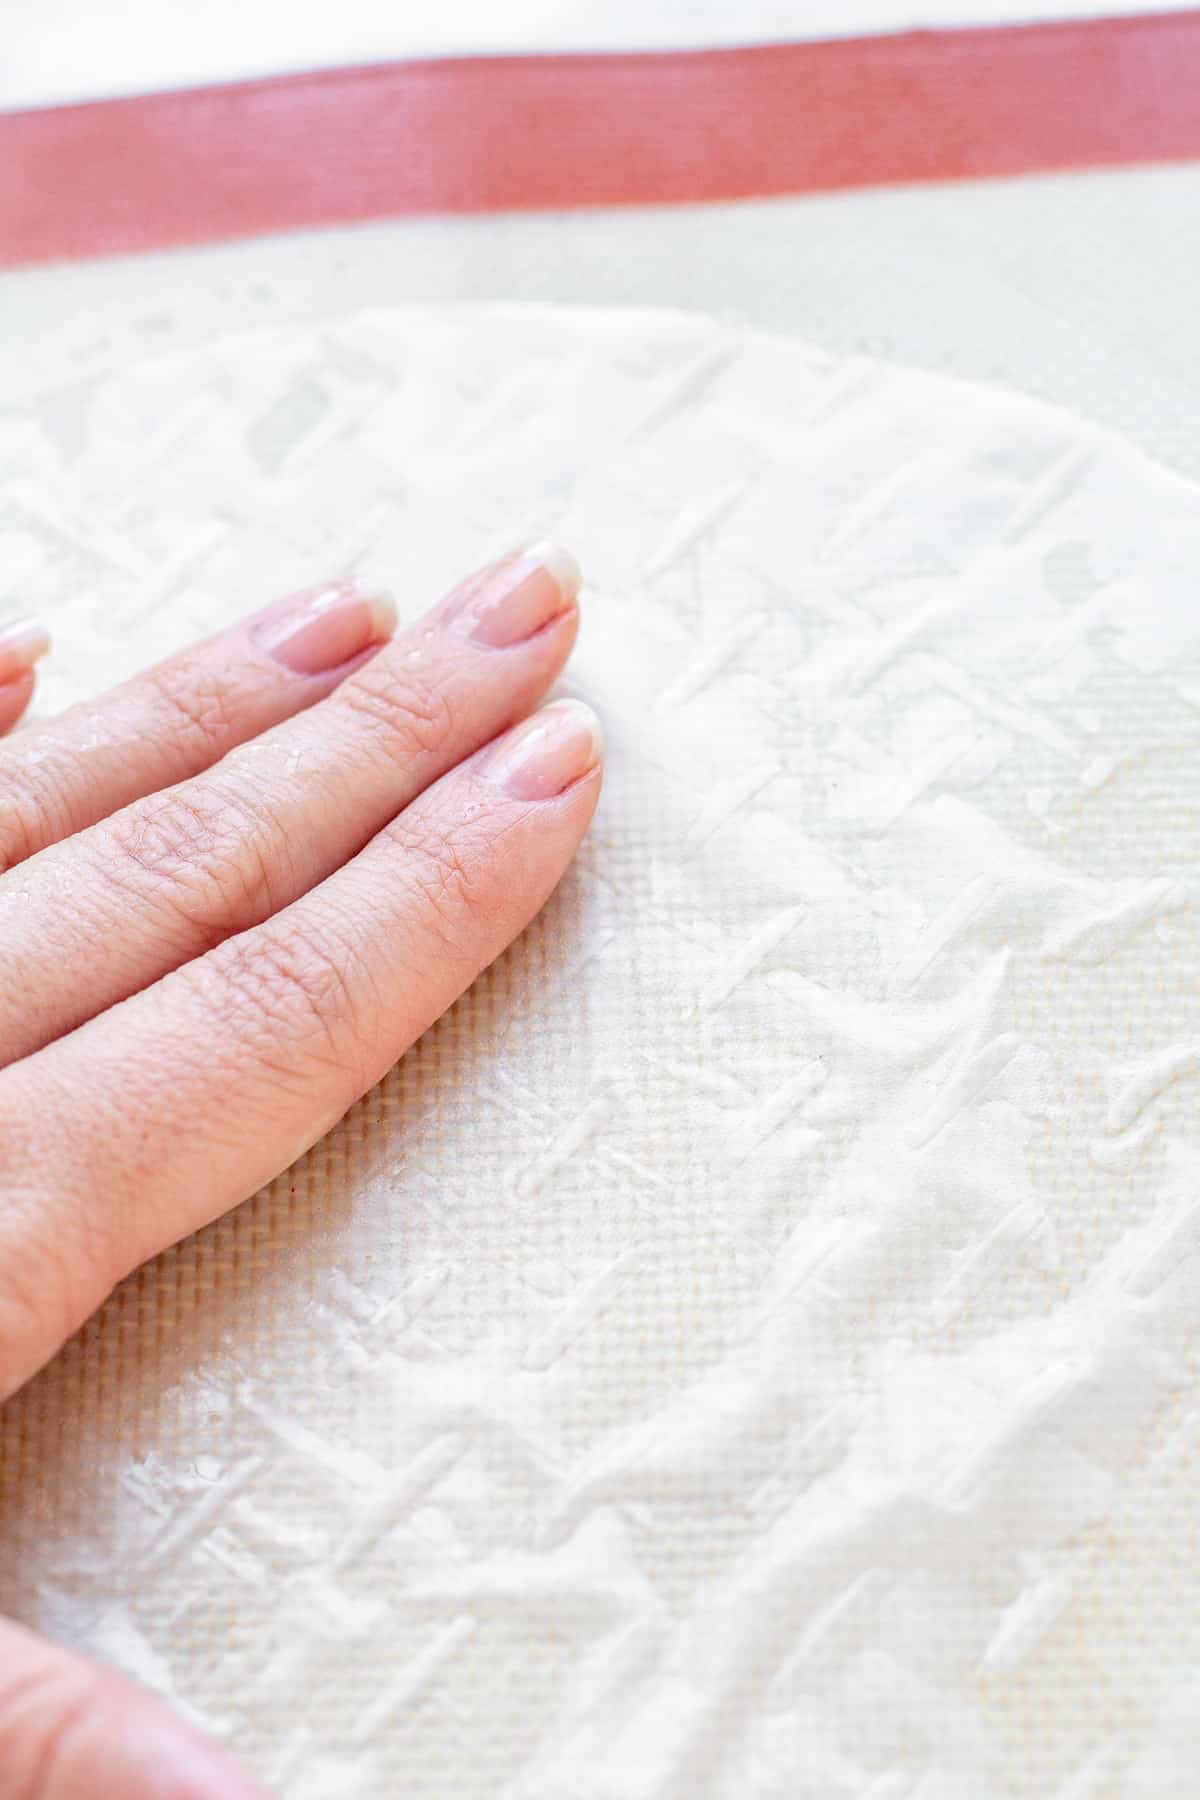
- Lay a piece of rice paper onto the mat. Spray the paper with water, using your hand to rub the water into the paper to soften it and help the paper absorb the water.
- Flip the paper over and repeat. Keep flipping the paper and spraying with water until it is a bit elastic, softened and you can no longer see any texture.
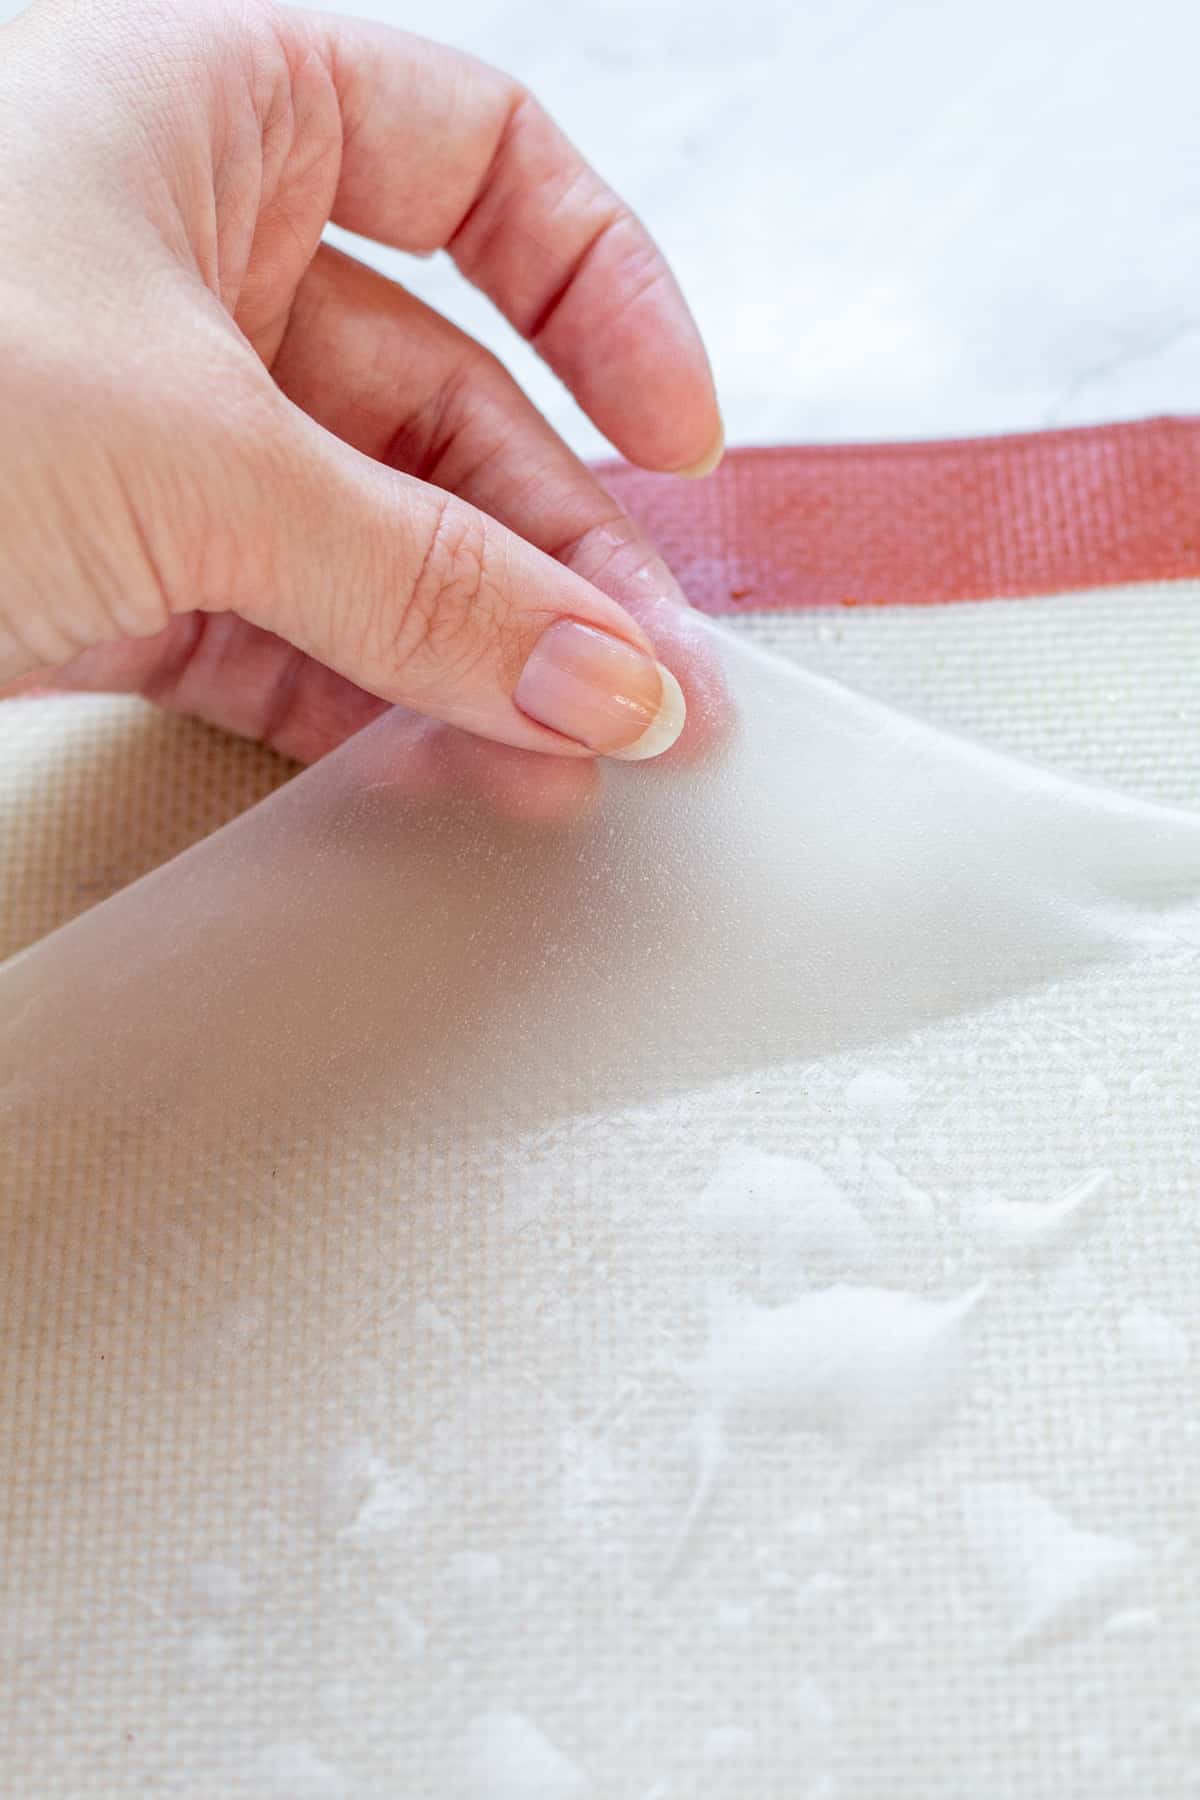
- Carefully lift the rice paper from the mat.
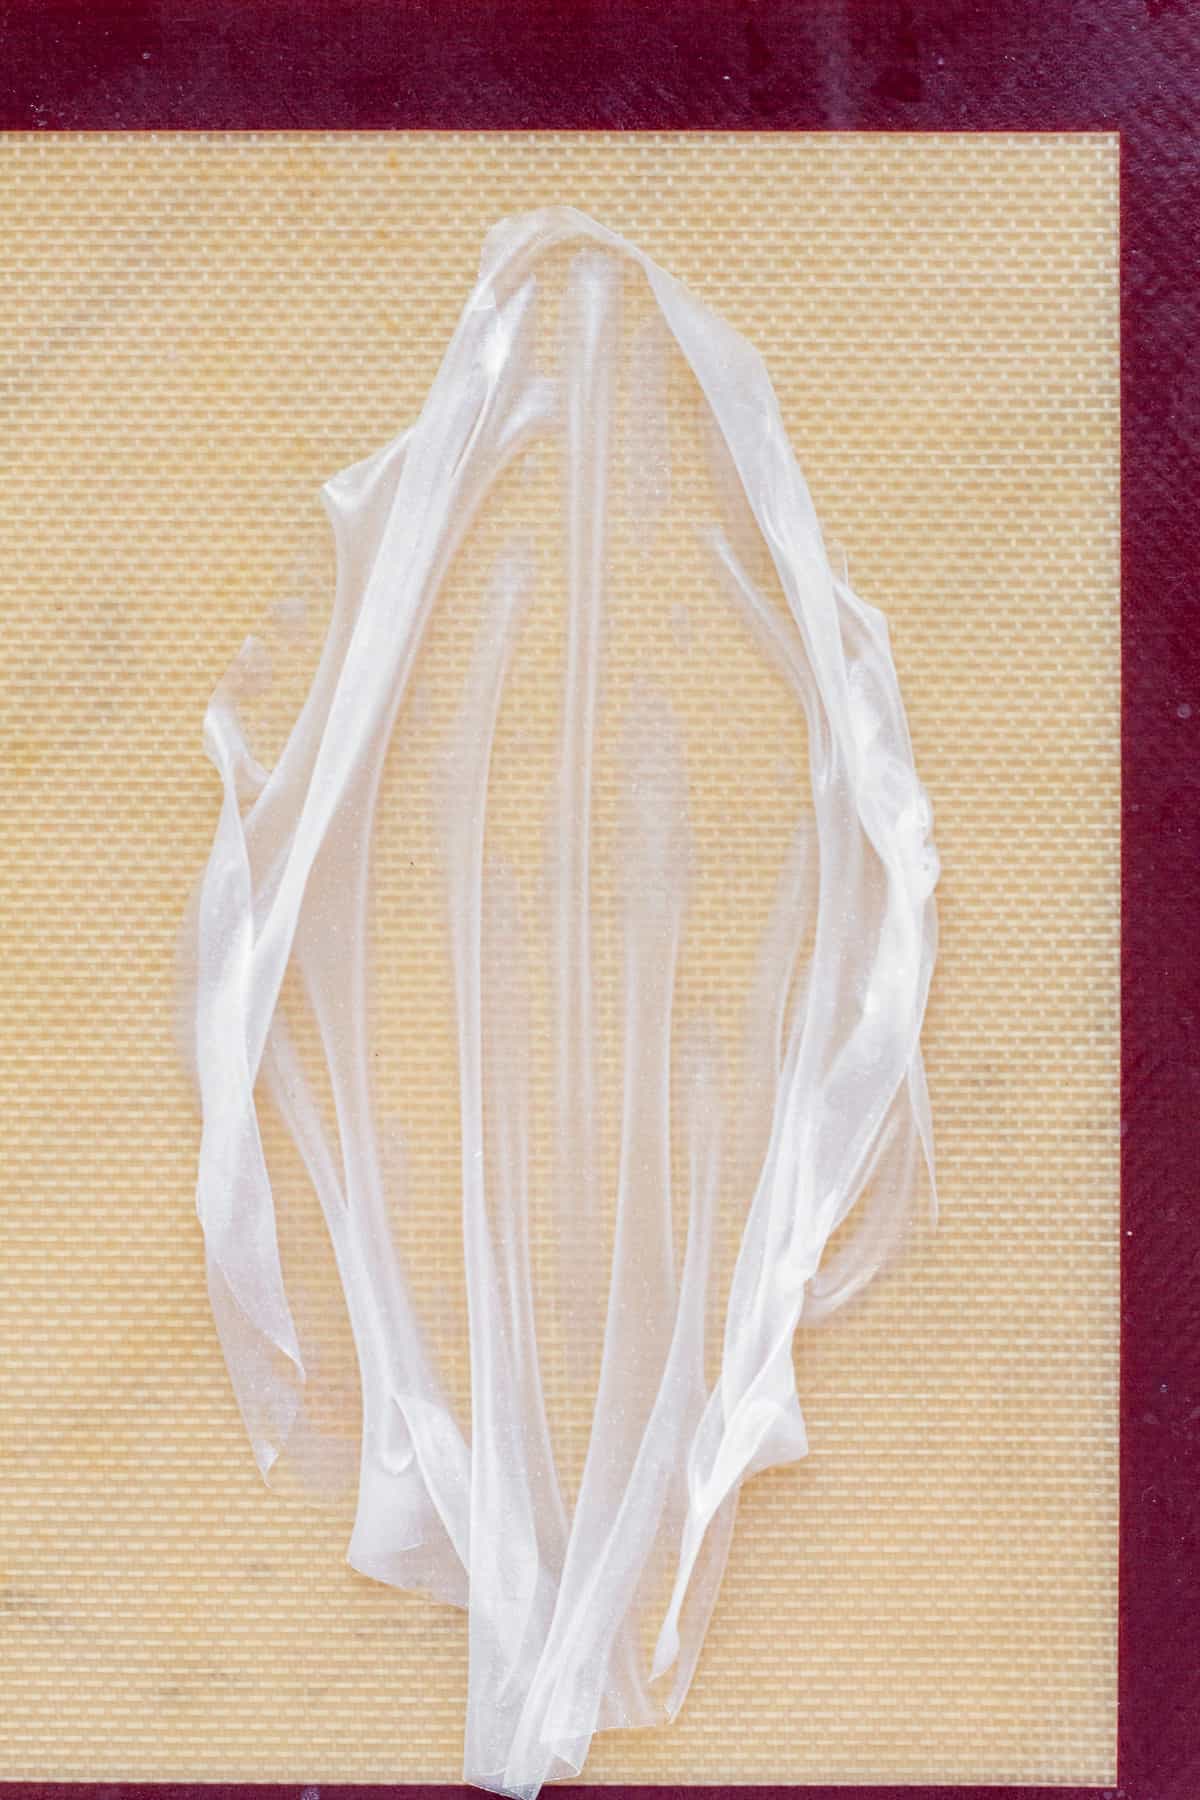
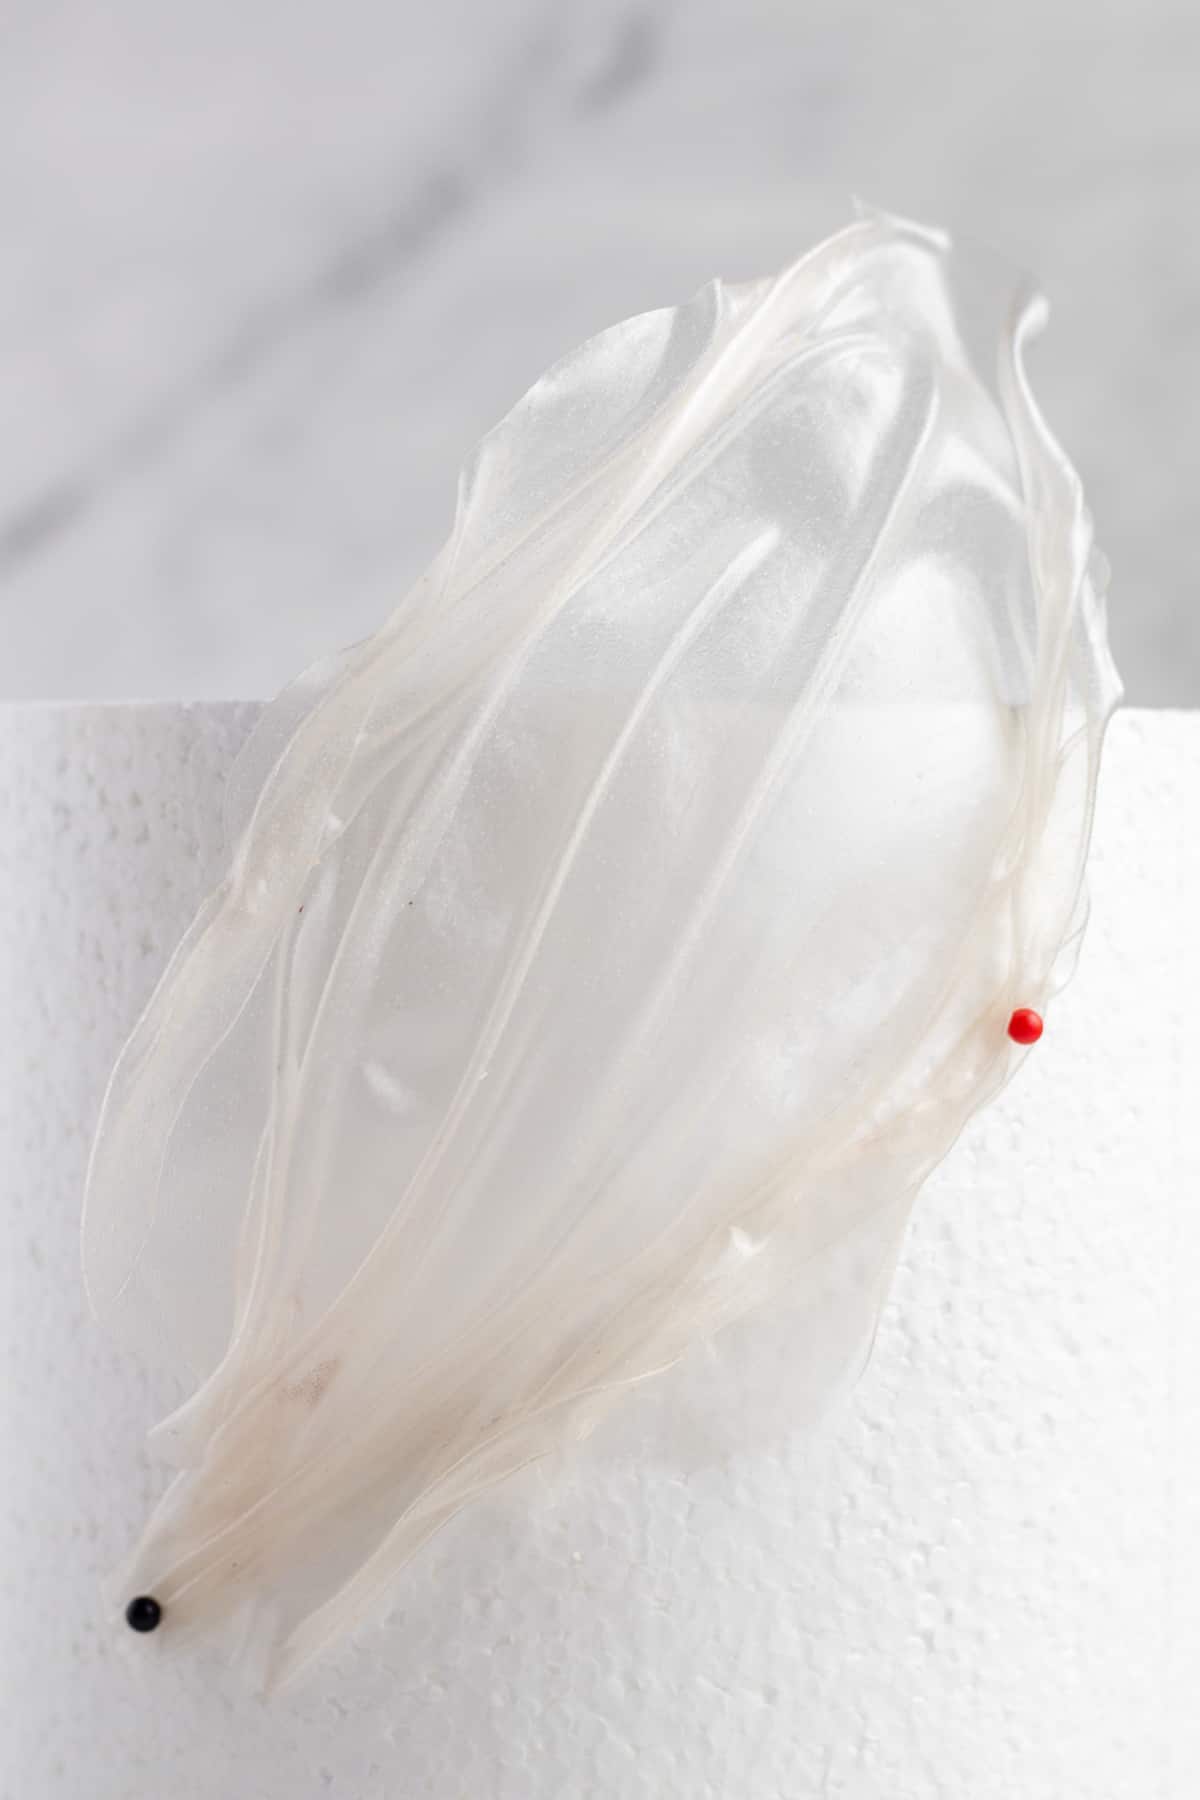
- Shape the paper into a ghost-like shape back onto the mat, tapering off the top and bottom but leaving the center wider to appear more billowy. You can also shape some so that just the bottom tapers, leaving the rest of the ghost billowy.
- Leave the ghosts to dry until they holds their shape but are still a bit pliable, about 4-6 hours.
I wanted some of the ghosts to have some movement and curve slightly, sort of like they're flying, so while they're still pliable, the ghosts can be shaped.
Curve the ghost around a foam cake dummy in the desired shape. Stabilize the shape by securing the ghost with pins. Let the ghost dry completely, overnight.
Attaching the ghosts to the cake
When the ghosts have dried, usually 8 hours, preferably overnight, they can be decorated. They should be hard, like plastic, with no damp spots. I kept my ghosts super simple by drawing on eyes and an open mouth with a black edible marker. You can definitely get as detailed as you like. For more depth and for the ghosts to stand out a little better, you can use a gray colored petal dust to dust in the crevices of the ghost.
To attach the ghosts to the cake, I used clear isomalt attached to paper lollipop sticks adhered to the back of the ghosts. This makes the ghosts more stable and secure and also allows them to have more of a 3D look, sort of popping off the cake a bit.
After heating the isomalt according to packaged instructions, dip the end of a lollipop stick to coat. Be careful when working with isomalt as it is incredibly hot.
Adhere the isomalt stick to the back of the ghost, preferably where the paper bunches, to make the stick less visible from the front of the ghost.
Hold the stick in place to dry a bit, then leave the isomalt to cool completely.
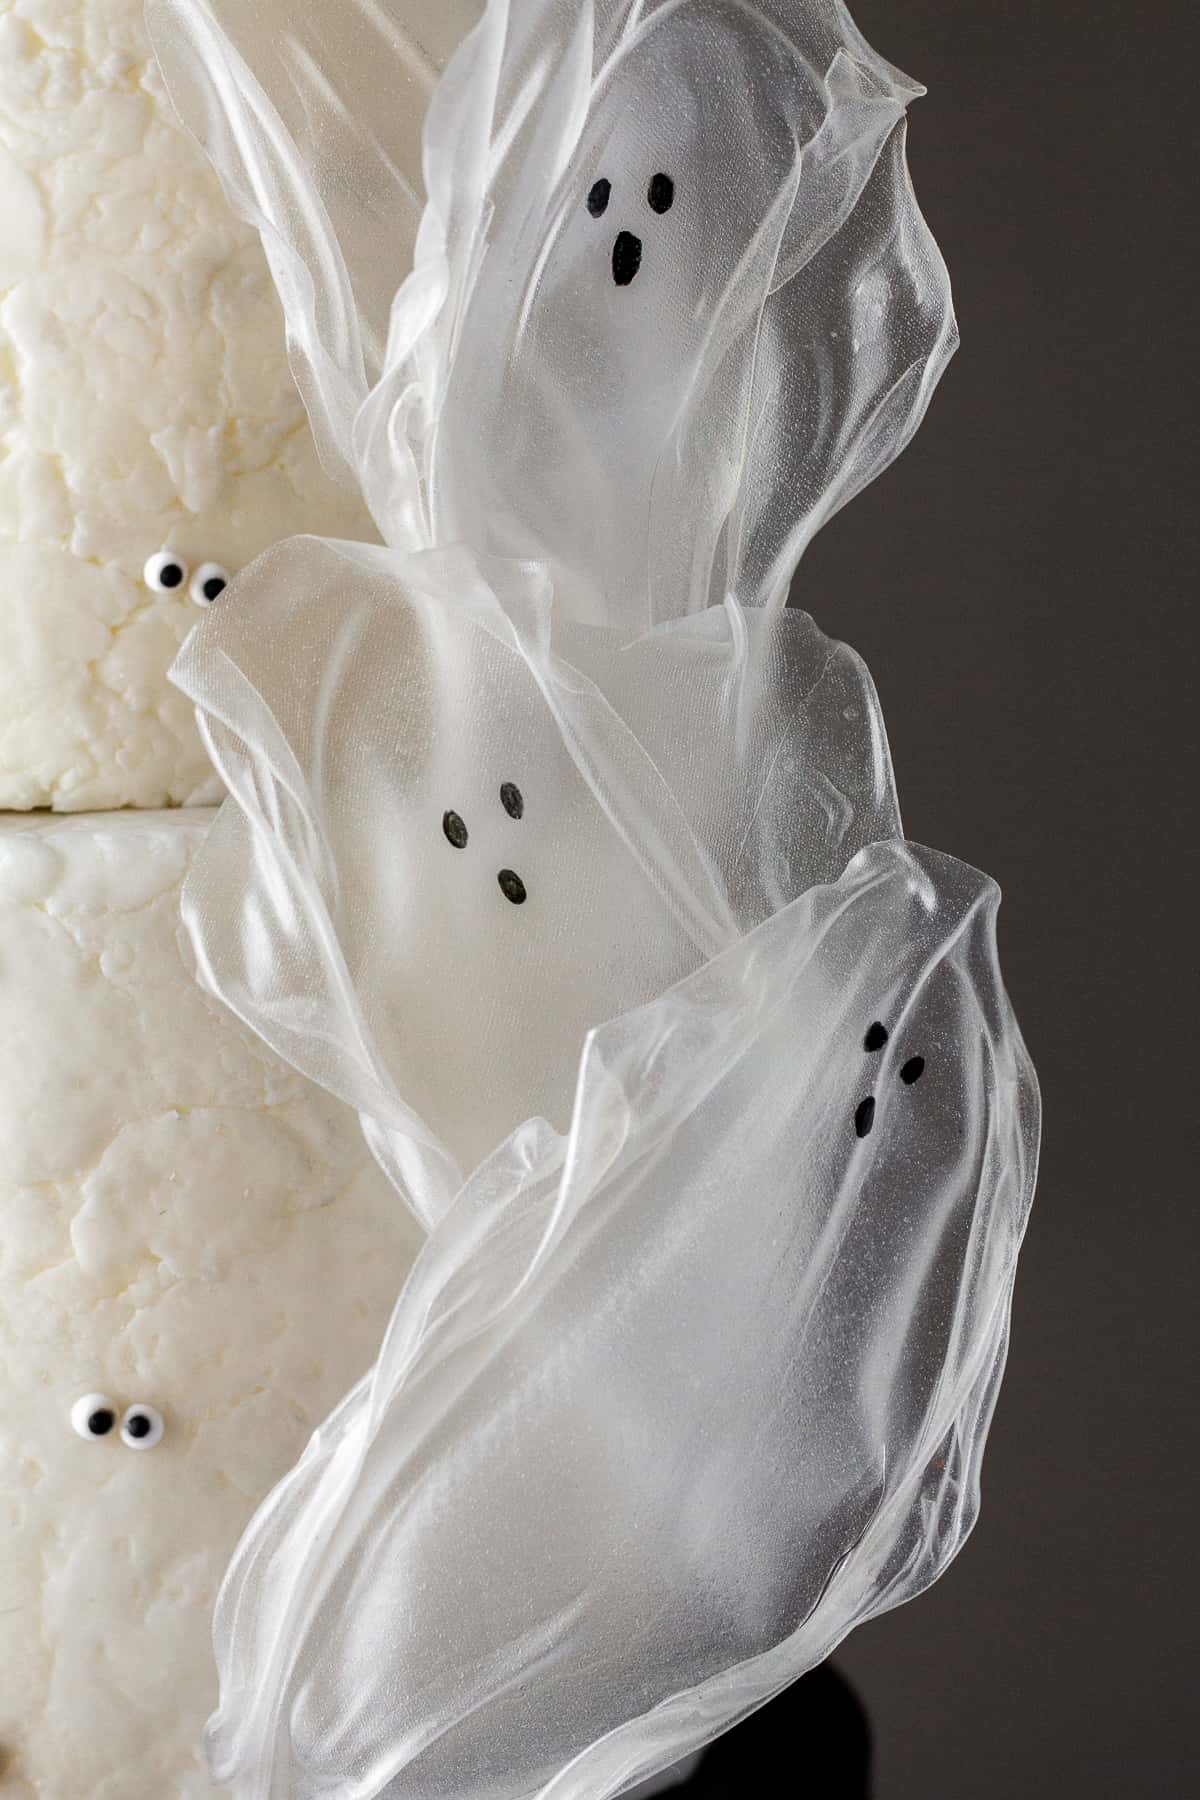
When the isomalt has cooled, attach the ghosts to the cake by inserting the lollipop sticks into the cake. I recommend inserting them into a cold cake because they will be much more secure, and less prone to falling out or sinking. I overlapped my ghosts and have them facing alternating directions.
I hope you find loads of creative ways to use these super cute, super easy Halloween rice paper ghosts. If you make these ghosts, tag me on Instagram. I'd love to see them!
Ash xx
For more Halloween tutorials, check out these posts:
Halloween Wafer Paper Mummy Cake Tutorial
Black Cocoa Cut Out Sugar Cookies
Wendi w says
I tried making the ghosts today. I don't have a mat so I used parchment paper and the rice roll doesn't stick. I sped up the process by using my hair dryer. I loved the end result. 👻
Amber says
These are great!
Every year we theme an intimate Halloween dinner party while celebrating a grandson and son in laws birthday.
This year the theme is ghosts and these will definitely be a part of the decor.
? if we are not eating these does the black marker NEED to be edible?
Or will a regular sharpie black marker bleed ink?
Ashley says
Hi Amber! As long as you remove them from the cake before serving it, then yes, you can use whatever marker you would like.
Maggie says
Hey Ashley, Thanks for great tutorial. Love how transparent the ghosts look. Is the cake wrapped in fondant?
Katie says
How many days ahead can you make these and how would you store them?
Ashley says
You can make weeks in advance as long as they're stored properly You want to keep them stored so that they don't come in any contact with humidity or moisture. I like to keep them in a cardboard box lined with paper towels.
Elizabeth says
Super cute!! I'm hoping to do this for Halloween this year. How did you get the texture on your cake?
Ashley says
Hi Elizabeth! I used a combination of new fondant and dried out fondant mixed and rolled together to create the texture. I also used a wrinkled piece of foil, pressing in to the fondant to add additional texture. I used some pale grey petal dust to highlight some of the cracks and creases to give it a bit of an aged look.
Wendi w says
I tried making the ghosts today. I don't have a mat so I used parchment paper and the rice roll doesn't stick. I sped up the process by using my hair dryer. I loved the end result. 👻
Bobbie Parsons says
Thank you. Simple and very effective
maria elena borjas says
Buenos días, me encanta lo que he visto quiero aprender para trabajar tan lindo como ustedes.. y así ofrecer trabajos maravillosos. Gracias