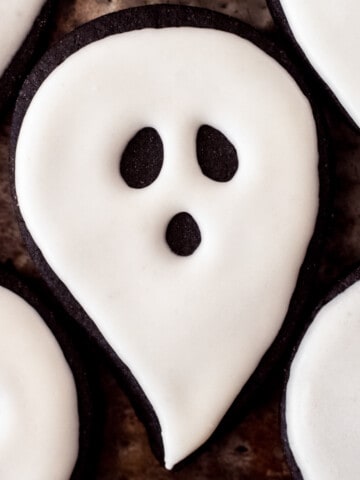
These black cookies have an intense black color, and dark cocoa flavor. These cut out cookies hold their shape, don't spread when baking and are the perfect black canvas for Halloween cookies, like these Jack-O'-Lantern Cookies or these Ghost Cookies.

Jump to:
What is Black Cocoa?
Black cocoa powder creates really dark, and chocolatey baked goods. Black cocoa powder is similar to Dutch processed but is heavily alkalized. It's the same cocoa used to make Oreos, and those black cookie ice cream sandwiches. It's deep and bittersweet in flavor, though, depending on the recipe, black cocoa is often used in conjunction with another cocoa powder to give baked goods more of a balanced, multi-faceted chocolate flavor.
Black cocoa is perfect for making black buttercream, blackout cakes, homemade chocolate sandwich cookies, these black sugar cookies and so much more.
Why You Will Love This Recipe
- These cookies are rich, dark and intensely chocolatey.
- No food coloring is needed, which means no staining mouths black when eaten.
- These cookies are easy to roll out, keep their shape when baking, and can be topped with buttercream, icing, dulce de leche, toasted meringue and more.
- These cookies are not too sweet, so the chocolate flavor can stand out when topped with icing.

Recipe Ingredients
All purpose flour
Fine sea salt
Unsalted butter
Granulated sugar
Egg
Vanilla Extract
Powdered sugar - for sprinkling and rolling out dough

Recipe Instructions
Before starting the recipe, preheat the oven to 350F and line two baking sheets with parchment paper.
- Whisk together the flour, cocoa and salt until combined. Set aside.
- Beat together the butter and sugar until thoroughly combined.
- Beat in the egg and vanilla extract.
- Beat in the flour/cocoa mixture until just combined.
- Turn the dough out onto a work surface sprinkled lightly with powdered sugar and form into a disc shape.
- Wrap tightly with plastic wrap and place in the refrigerator for at least 30 minutes.
- Roll out the chilled dough to ⅛" to ¼" thick.
- Cut out desired shapes and place the cookies 2" apart on the cookie sheets. Place the cookie sheets into the refrigerator for 30 minutes to chill.
- Bake for 12-17 minutes. Cool completely before icing.

Decorating Instructions
Prepare 15-20 second royal icing colors as directed. For decorating these cookies, you will need: Piping bag fitted with a #2 piping tip filled with orange icing, piping bag fitted with a #13 piping tip filled with a small amount of brown icing, piping bag fitted with a #2 piping tip filled with a small amount of green icing.
- Since these cookies are so dark, tracing a design onto the cookies to pipe over with an edible marker isn't really an option, unless you have a white marker. Instead, use a scribe tool or a small paring knife to etch your design into the cookies.
- Pipe an outline of the Jack-O'-Lantern shape, segments, eyes, nose, and mouth with orange icing. If you're just making pumpkins, skip outlining the eyes, nose and mouth.
- For Jack-O'-Lantern cookies, pipe and fill alternate sections with icing, piping around the facial features. Allow the sections to set before outlining and filling the remaining two sections.
- For the pumpkins, pipe and fill alternate sections with icing, piping around the facial features. Allow the sections to set before outlining and filling the remaining two sections.
- When the orange icing has dried, pipe a stem with the brown icing. Pipe vines on the pumpkin cookies with the green royal icing.

Baking and Decorating Tips
- When beating together the butter and sugar, beat just until combined. Overbeating the butter and sugar can cause the cookies to puff up or distort when baking.
- Because these cookies are black, it can be hard to tell when they are done. The edges should be set and the center of the cookies are no longer shiny, wet, or damp looking.
- For a crispier cookie, roll out the dough a bit thinner, about ⅛” thick.
- Rolling the cookies between two pieces of parchment paper or wax paper makes for easier clean up and prevents the dough from sticking to your work surface and rolling pin.
- Prepare your royal icing in advance to let it sit and fully develop its color. Prepare the piping bags before beginning decorating.

Storage and Freezing
Cookie dough can be kept in the fridge for up to two days. Dough and raw cookie cut outs can also be frozen for up to three months.
Baked and unfrosted cookies can be frozen for up to three months.
Frosted cookies can be left at room temperature for up to 2-3 weeks. These cookies are perfect for bagging individually once iced, for party favors or gifts.
Recipe FAQs
There are two types of cocoa we use most often for baking - Dutch process and natural. Natural cocoa powder is the most common. It's the most natural of cocoa powders, hence its name. Natural cocoa powder is lighter in color and used in recipes with baking soda, where the acid in the cocoa is neutralized, enhancing the cocoa flavor.
Dutch processed cocoa is alkalized to reduce the acidity. It makes the cocoa powder darker, smoother and more mild in flavor. This type of cocoa powder does not need baking soda to neutralize, so it is commonly used in recipes with baking powder.
Black cocoa powder is similar to Dutch process, except that it is heavily alkalized. It's deep and bittersweet in flavor, though, depending on the recipe, black cocoa is often used in conjunction with another cocoa powder to give the baked good more of a balanced, multi-faceted chocolate flavor.
10-14 large 3" - 4" cookies or 25 small 2" - 2.5" cookies
When making smaller cookies, reduce the baking time to 8-10 minutes.
Yes, this recipe can be doubled.

More Cookie Recipes to Try
Did you make this recipe? Share it with us! Tag @littlevintagebaking on Instagram and leave a star rating below if you LOVED this recipe. For more baking and decorating ideas follow me on Pinterest.
Recipe

Black Cookies (Jack-O'-Lantern Cookies)
Ingredients
- 2 ½ cups all purpose flour
- ½ cup black cocoa powder
- ½ teaspoon fine sea salt
- 1 cup unsalted butter, room temperature
- 1 cup granulated sugar
- 1 large egg, room temperature
- 2 teaspoons pure vanilla extract
- 1 recipe Royal icing
Instructions
- Preheat the oven to 350F. Line two cookie sheets with parchment paper.
- In a medium bowl, whisk together the flour, cocoa and salt until combined. Set aside.2 ½ cups all purpose flour, ½ cup black cocoa powder, ½ teaspoon fine sea salt
- In the bowl of a stand mixer fitted with the paddle attachment, beat together the butter and sugar until thoroughly combined.1 cup unsalted butter, room temperature, 1 cup granulated sugar
- Add the egg, followed by the vanilla extract beating until just combined.1 large egg, room temperature, 2 teaspoons pure vanilla extract
- Scrape down the bowl. With the mixer on low speed, gradually add the flour/cocoa mixture and beat until just combined.
- Turn the dough out onto a work surface sprinkled lightly with confectioner's sugar. Pat the dough into a disc shape.
- Wrap tightly with plastic wrap and place in the refrigerator for at least 30 minutes.
- Place the chilled dough on a work surface that has been lightly sprinkled with flour. Sprinkle the top of the dough and the rolling pin lightly with confectioner's sugar to prevent any sticking.
- Roll out the dough to ⅛" - ¼" thick, depending on your preference, rotating the dough as you roll to prevent the dough from sticking.
- Cut out desired shapes and place the cookies 2" apart on the cookie sheets.
- Place the cookie sheets into the refrigerator for 30 minutes to chill.
- Bake the cookies for 12-17 minutes. Rotate the cookie sheets, halfway through baking. You're looking for the cookies to be soft when touched in the center, but fully cooked. Baking the cookies longer will result in a crispier cookie while baking them to just cooked will keep them soft.
- Let the cookies cool on the cookie sheets for 10 minutes, before transferring them to a cooling rack to cool completely before decorating.1 recipe Royal icing
Louise Edmunds says
I used normal swiss cocoa powder. I had to add a bit more flour because even with the chilling etc the heads were coming off my cookies as I tried to separate them from the cutter. I also had to reduce cooking time to 12 minutes because the first batch burnt. I used a non-fan forced oven setting because I find things hold their shape better that way and I don't have to turn halfway through. I didn't re-refrigerate before baking either. All in all they look great.
Ashley says
Black cocoa is incredibly dry, so that was a really good call on adding more flour with regular cocoa powder - it has more fat in it. So happy they worked out for you! -Ash-
Brittanie says
This recipe came out really good! My husband loves them. Thank you!!